Objects
The data you store in your IDrive® e2 account is designated as objects and are assigned metadata and a unique identifier. The size of an object may vary from a few bytes to several gigabytes.
Note: Object name cannot be more than 254 characters.
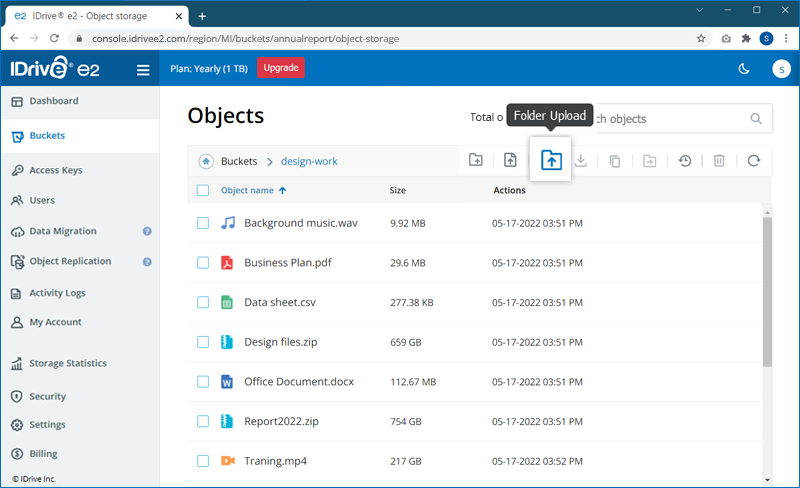
To add files within a bucket,
- Sign in to your IDrive® e2 account and navigate to the 'Buckets' page.
- Click on the bucket where you want to store the file.
- Click
 to upload files and
  to upload folders.
You can also use
to upload folders.
You can also use  to create a new folder and upload files/folders within it.
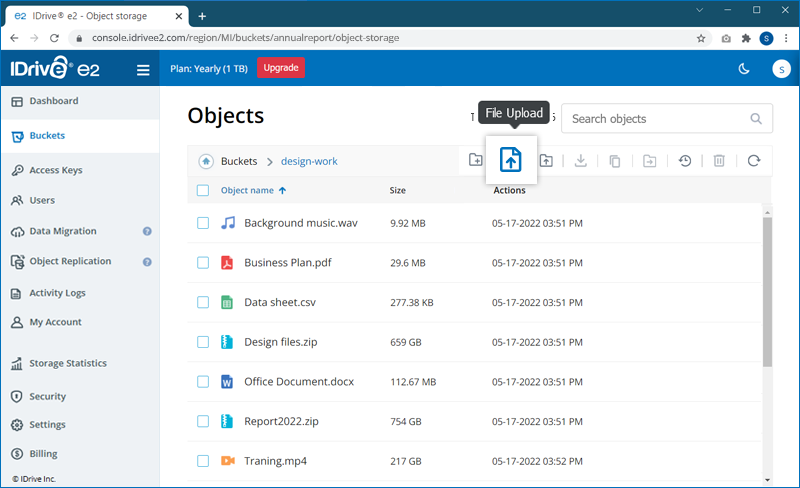
- Select and upload the files from your computer. The upload progress will be displayed in the bottom-right corner.
Note: You can click to abort a file upload.
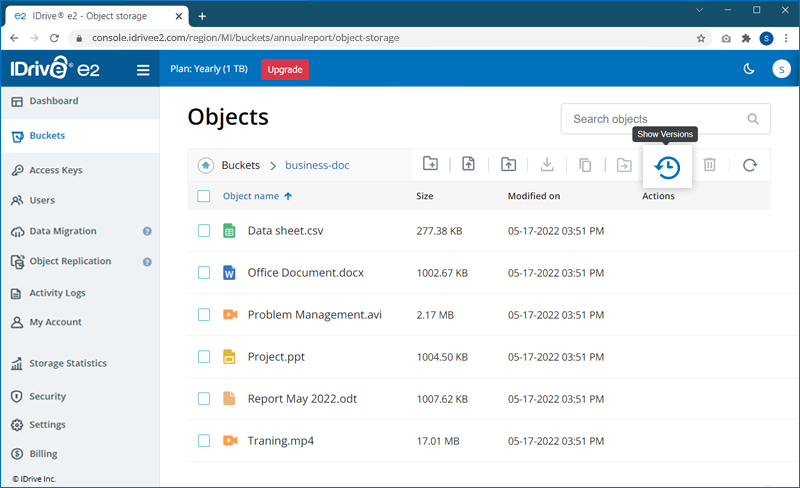
Click ![]() corresponding to any object for information such as object size, date of last modification, access level, version ID, and, in the case of public access, also the object URL.
corresponding to any object for information such as object size, date of last modification, access level, version ID, and, in the case of public access, also the object URL.
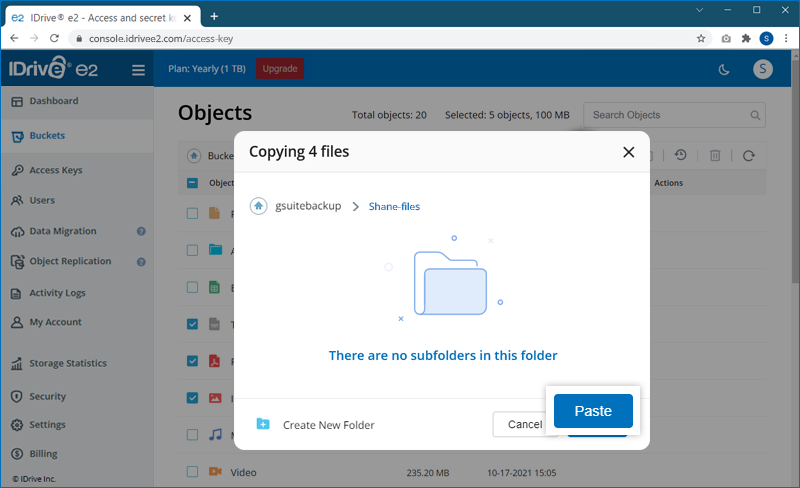
You can simultaneously copy multiple files from one folder to another folder within a bucket.
To copy the files,
- Sign in to your IDrive® e2 account and navigate to the 'Buckets' page.
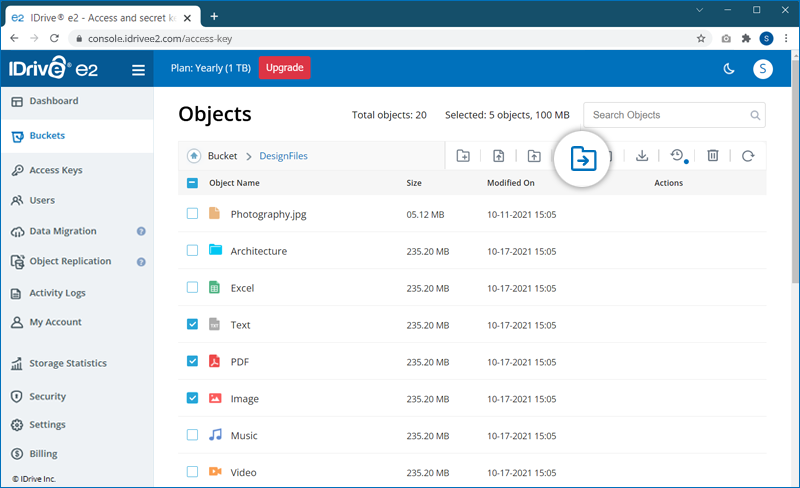
- Click the required bucket. Select the files to copy, and click
 . A popup will appear.
Note: You can select only up to 100 files at once.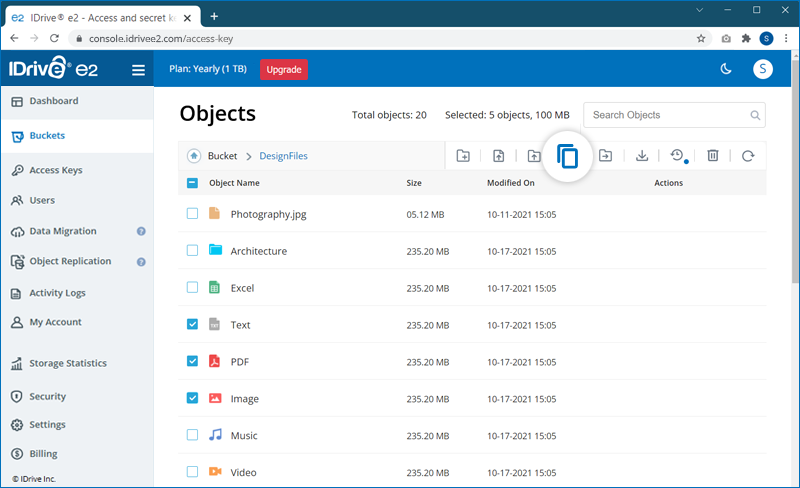
- Choose a folder in the bucket for pasting the copied files. Click if you want to create a new folder to paste the files.
- Click 'Paste'.
The progress will be displayed on the screen. You can click
 to cancel the ongoing operation.
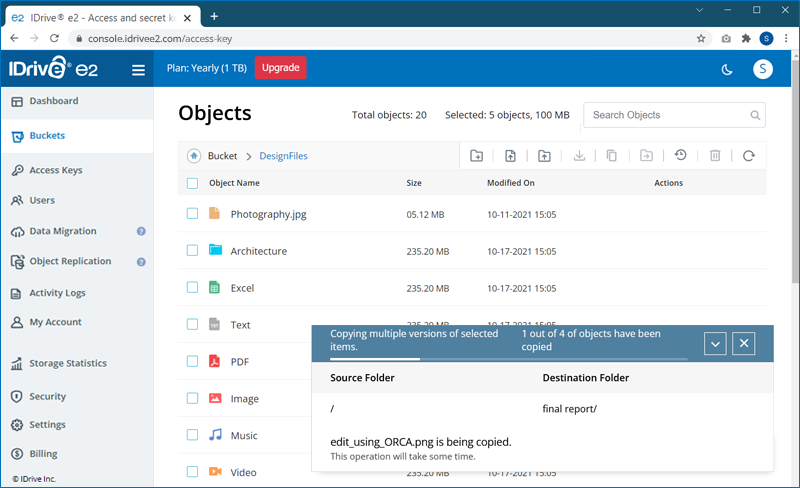
A success message will be displayed once the files are copied to the selected folder.
Note: IDrive® e2 does not support copying the entire folder.
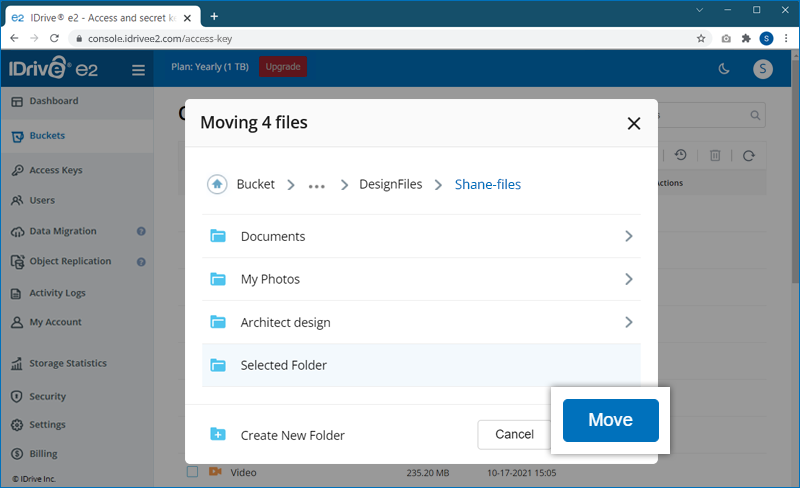
You can simultaneously move or transfer multiple files from one folder to another folder within a bucket.
To move the files,
- Sign in to your IDrive® e2 account and navigate to the 'Buckets' page.
- Click the required bucket. Select the required files, and click
 . A popup will appear.
Note: You can select only up to 100 files at once.
- Choose a folder in the bucket for moving the selected files. Click if you want to create a new folder to move the files.
- Click 'Move'.
The progress will be displayed on the screen. You can click
to cancel the ongoing operation.
A success message will be displayed once the files are moved to the selected folder.
Note: IDrive® e2 does not support moving the entire folder.
Yes, you can add tags for an object. A tag has two parts - key and label. The key must be a unique term used only once as a tag for the object, whereas the value describes the tag further.
To add a tag,
- Sign in to your IDrive® e2 account and navigate to the 'Buckets' page.
- Click on the bucket where the required file is stored
- Click on the object to open the object details.
- Click Add tag.
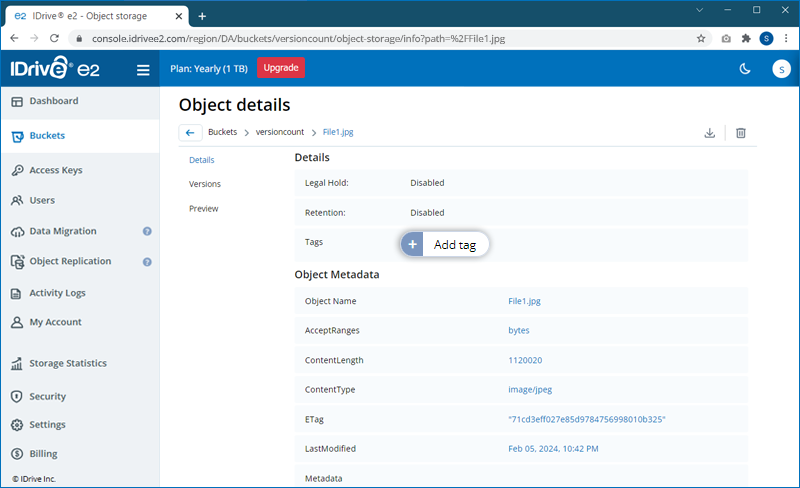
- Enter the Tag Key and Tag Label.
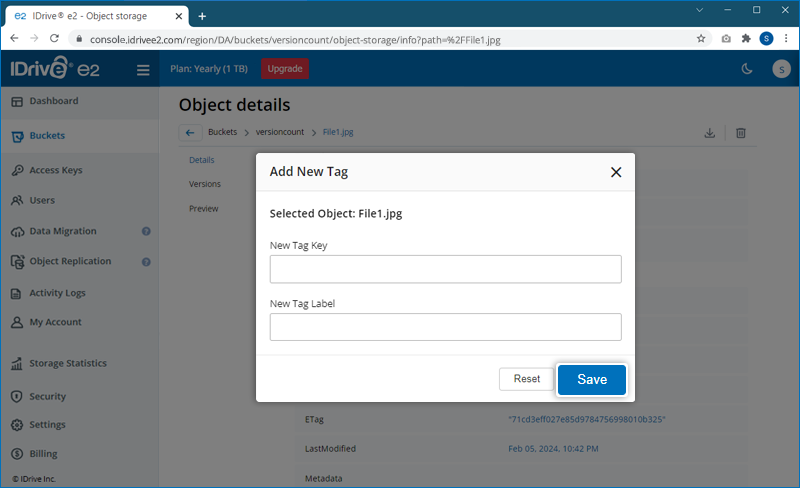
- Click Save.
- Sign in to your IDrive® e2 account and navigate to 'the Buckets' page.
- Click the required bucket. Select the object to rename, and click
 .
.
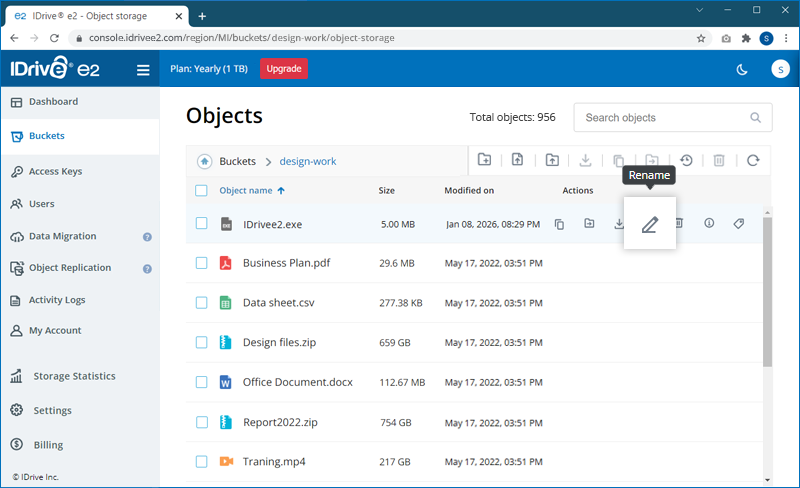
- In the 'Object Rename' pop-up, enter a new name for the object and click 'Rename'. A success message will be displayed once the object gets renamed.
Note: For unversioned buckets, enable the 'Overwrite Existing Object' check box if you want to rename an object to the name of an existing object.
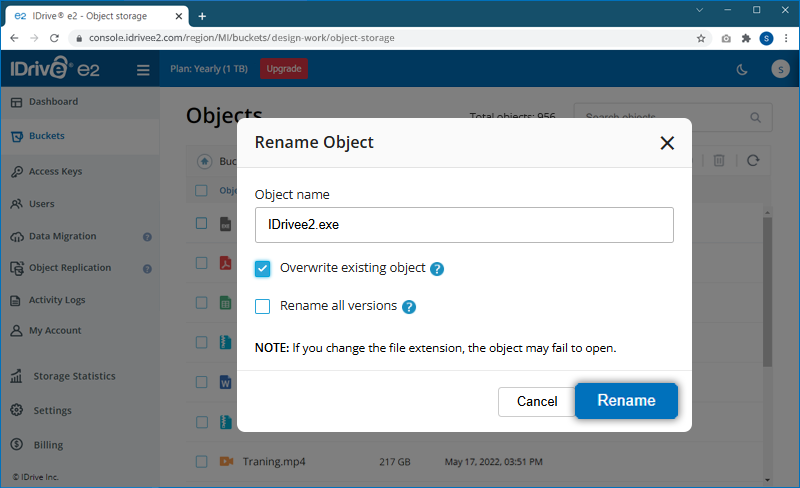
Yes, you can rename all versions of the object by following the steps below.
- Sign in to your IDrive® e2 account and navigate to 'the Buckets' page.
- Select the object with versions, then click . A pop appears.
- In the 'Object Rename' pop-up, enter a new name for the object and select 'Rename all versions', then click 'Rename'.
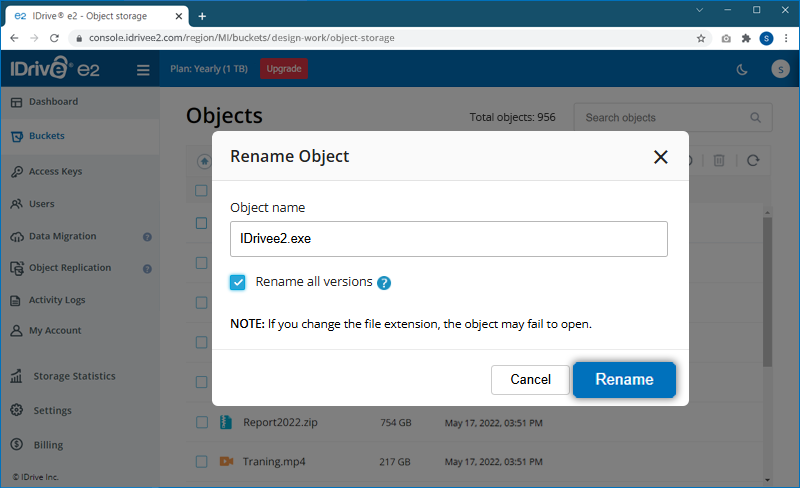
- Now, the object, along with all its versions, will get renamed. A success message will be displayed once the object gets renamed.
Note:
- Renaming the object is not allowed in the source bucket configured for the replication job.
- If versioning is disabled after being enabled, renaming or uploading an object with the same name creates a null version but does not delete the previous versions of the object.
Retrieve the data stored in your IDrive® e2 account from anywhere.
To download your files/objects via the IDrive® e2 web console,
- Sign in to your IDrive® e2 account.
- Navigate to the 'Bucket' page.
- Click on the bucket from which you want to retrieve the files.
- Select the objects you want to download and click
 .
.
Alternatively, hover over the required object and click.
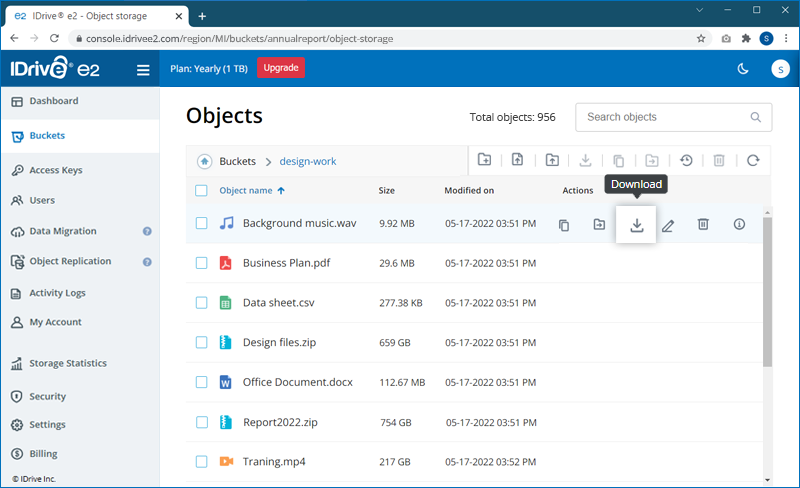
The IDrive® e2 web console does not provide the folder download option. Use an S3 compatible client to download a folder directory structure, or a large number of files/data. Know more >
With Versioning Enabled: If versioning is enabled for your bucket, overwriting an object with the same key does not delete the old version. Instead, the previous version is preserved, and the new object becomes the latest version. You can still access earlier versions through the versioning API or interface.
Without Versioning: If versioning is not enabled, overwriting an object replaces the existing object entirely. The old object is permanently deleted, and only the new version is stored.
File deletions can occur when you delete an individual file, a parent folder, a bucket, or cancel an account. Once a file, folder, bucket, or account is deleted on IDrive® e2 through the API or Web Console, the content is permanently removed from IDrive® e2, and we cannot recover the deleted content.
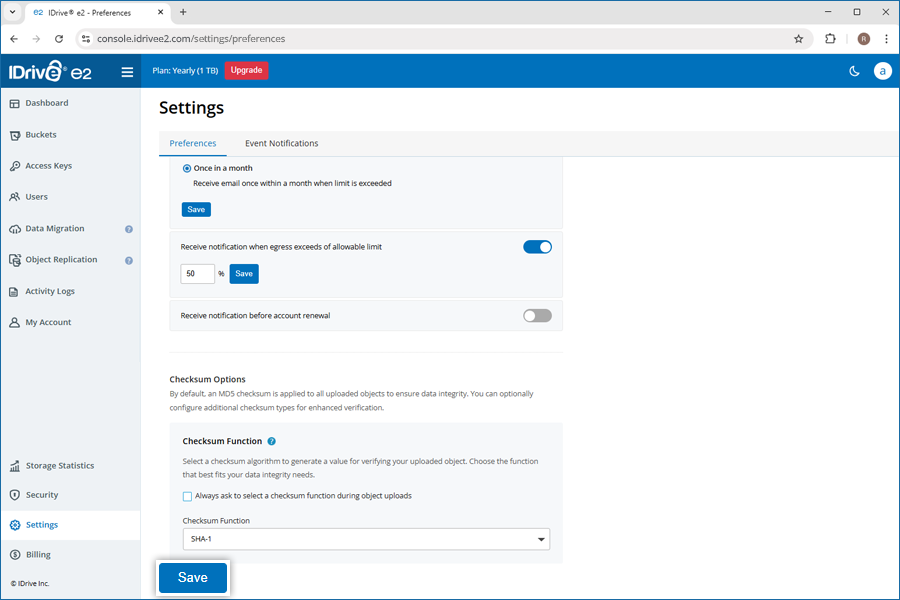
Checksums help verify data integrity by generating a unique value for your uploaded file. By applying a checksum during object uploads, you can detect any file corruption or tampering that may have occurred in transit or storage.
To select your preferred checksum function for all uploads,
- Sign in to your IDrive® e2 account and go to 'Settings'.
- Go to 'Preferences' > 'Checksum Options'.
- The 'Always ask to select a checksum function during object uploads' option is selected by default. Disable this option.
- Select the required checksum function (e.g., CRC, SHA variants) from the dropdown. This will be applicable for all object uploads.
Note: If no checksum function is selected, then an MD5 checksum is applied to all uploaded objects by default. - Click 'Save'.
To apply a checksum while uploading files to IDrive® e2
If 'Always ask to select a checksum function during object uploads' option is selected in 'Checksum Options', you will be prompted to choose a checksum during each upload.
- After selecting objects, go to 'Apply Checksum' in the 'Upload Objects' popup.
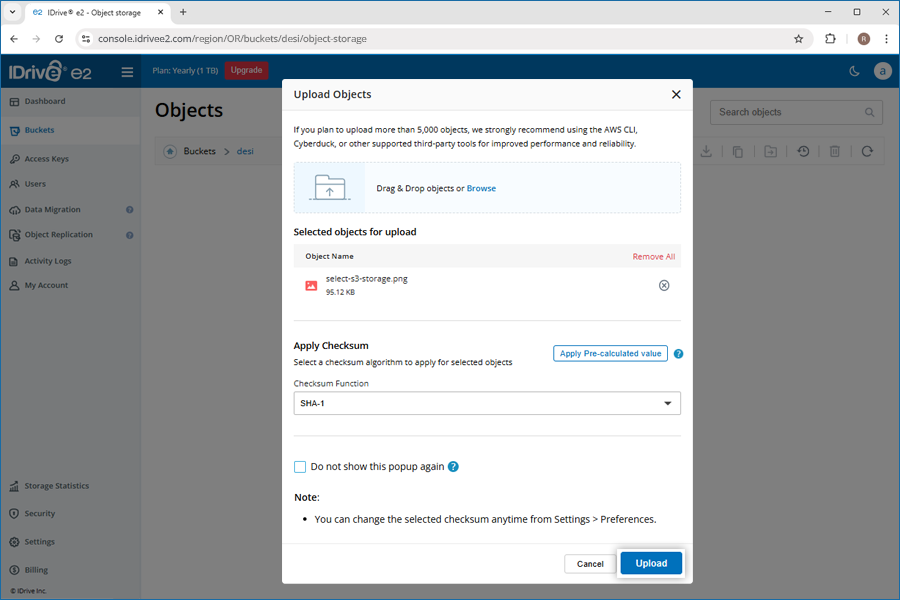
- Select a checksum function (e.g., CRC, SHA variants) from the dropdown.
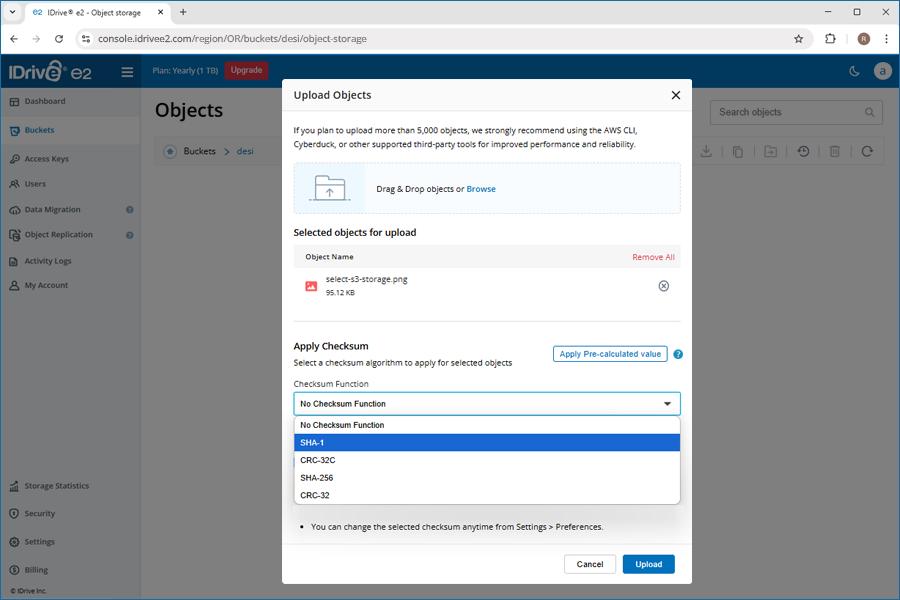
- On clicking 'Upload' the selected checksum will be used to verify object integrity during upload.
Note:
- If you select a checksum function and choose to hide this popup for future uploads, it will be automatically applied to all future object uploads.
- You can change the selected checksum anytime from 'Settings' > 'Preferences'.
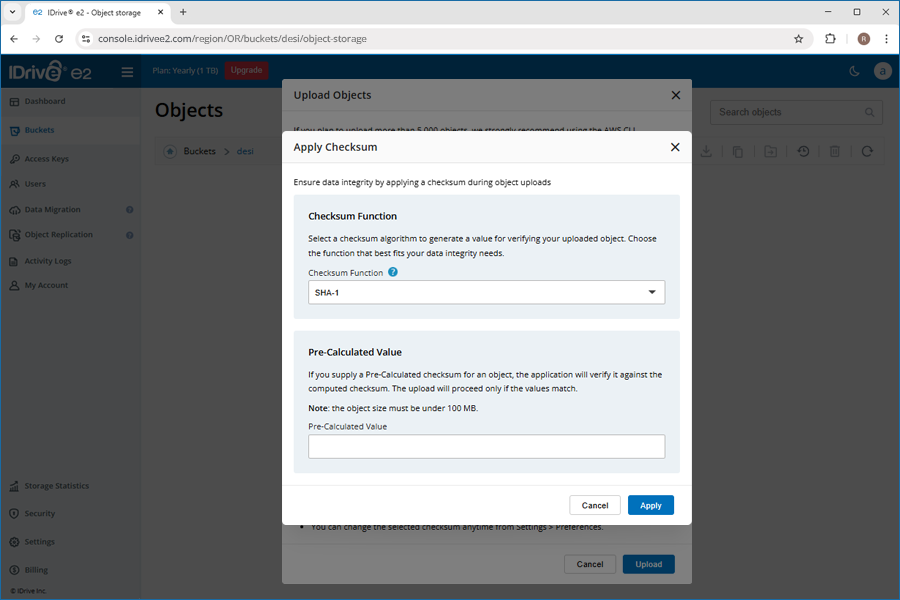
To upload a file with pre-calculated checksum value
- After selecting objects, click 'Apply Pre-calculated Value' in the 'Upload Objects' popup.
- Select a checksum function (e.g., CRC, SHA variants) from the dropdown.
- Enter a base64 pre-calculated checksum value for the object.
- Click 'Apply'. The pre-calculated checksum value will be used to verify object integrity during upload.
Note: You can provide a pre-calculated checksum for a single object up to 100 MB in size.
Object locking restricts the modification or deletion of an object. This helps secure the files present in the buckets from any malware or cyber threats. You can enable object locking while creating the bucket.
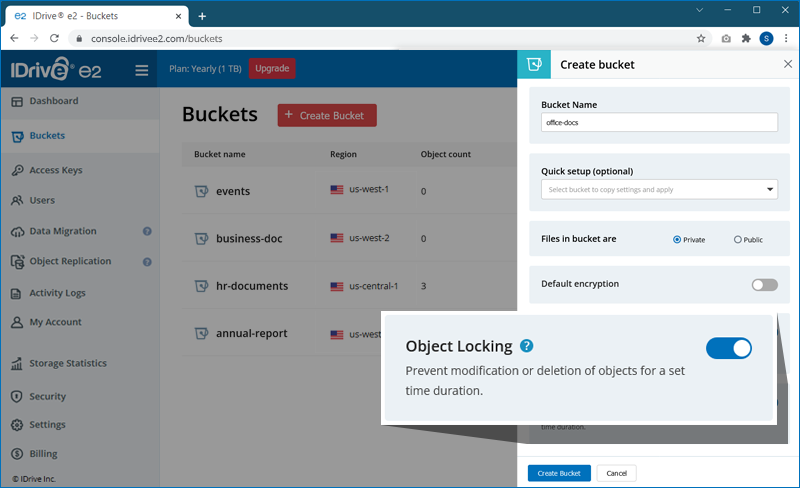
Note: Object locking applies to individual objects. Users can enable/disable locking on any object in a bucket, if object lock is enabled for the bucket.
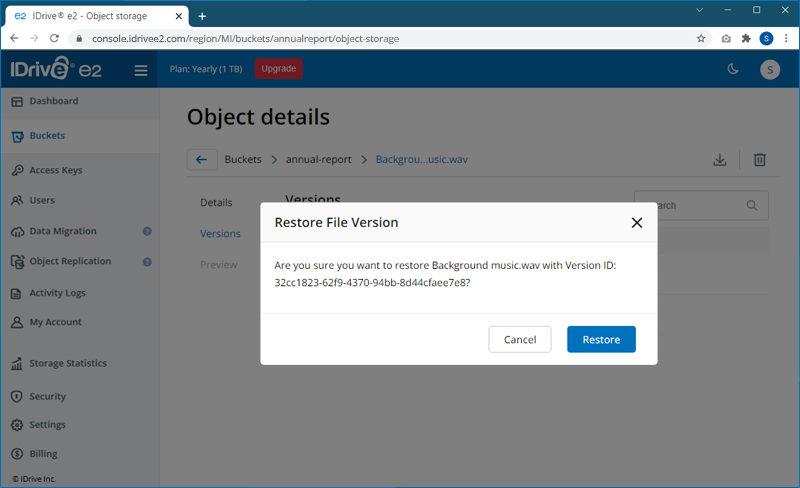
When versioning is enabled for a bucket, every modification made to the objects in the bucket will be automatically saved as a new copy or version of the object. Versioning allows you to restore older versions of an object.
To restore versions of an object,
- Navigate to the 'Buckets tab', and click the bucket storing the required objects.
- Click on the object name to view 'Object details'.
- Go to the 'Versions' tab to view all versions of the object. Click
 next to the version you wish to restore.
- Click 'Restore' to confirm.
Alternatively, to restore versions of an object,
- In the 'Buckets' tab, click
 on the top-right of the bucket to see versions of all objects in the bucket.
- Select the required versions and click
 . You can also click next to the version that you want to restore.
The download progress will be displayed in the bottom-right corner.
Note: Click ![]() to abort the download.
to abort the download.
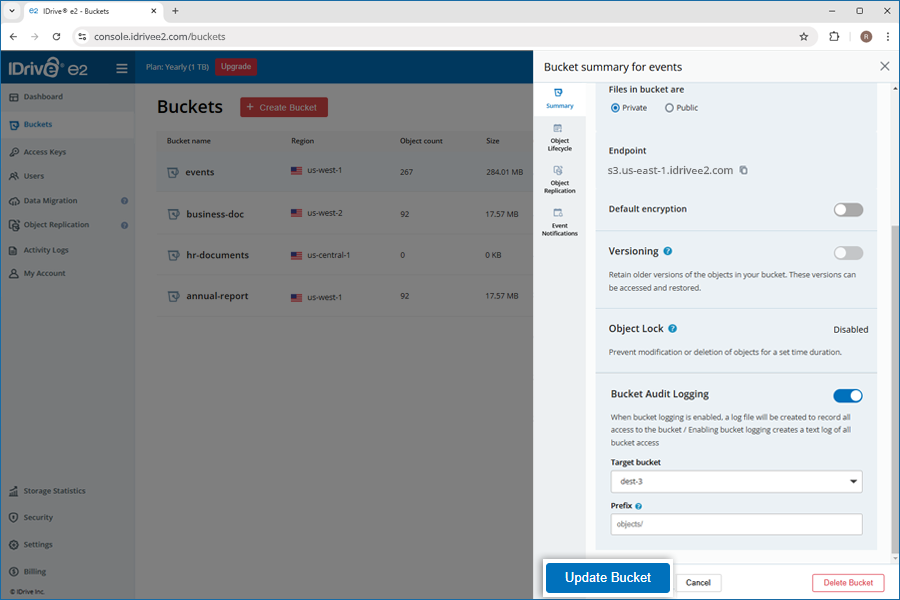
Bucket audit logging tracks and records all access to the bucket. When enabled, it creates a log file that captures details such as the types of access requests, the requested resources, and the date and time each request was processed.
You can enable bucket audit logging while creating a new bucket or for an existing one.
To enable bucket audit logging,
- Sign in to IDrive® e2 account via any browser.
- Navigate to the Buckets.
- Hover over the bucket for which you want to enable the bucket audit logging and click
 .
.
- Use the toggle switch to enable Bucket Audit Logging.
- Select the Target bucket from the dropdown. The generated log file will be stored in this destination. Note: The source and Target bucket should be in the same region.
- Enter a prefix to specify the folder where the log file will be stored in the target bucket.
- Click Update Bucket.
Bucket audit logs are uploaded based on either of the following conditions:
- Time-based upload: Logs are automatically uploaded every 60 minutes.
- Entry-based upload: Logs are uploaded as soon as they exceed 10,000 entries.
When retention is enabled for a bucket, any object uploaded to the bucket will automatically get locked for the duration specified in the bucket retention configuration. Retention can be configured on the web-console while creating the buckets or you can use any S3 compatible client to set various retention policies to the bucket by following JSON protocol based on your requirements.
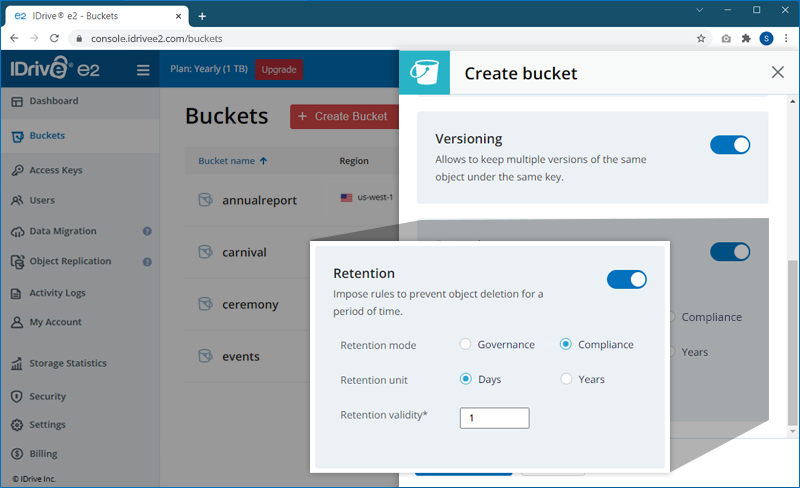
IDrive® e2 supports the following retention modes:
Governance Mode: This will lock the object for the configured retention policy. However, users can set the "s3:BypassGovernanceRetention" permission to bypass the retention policy and modify or delete files.
Compliance Mode: This will lock the object for the configured retention policy, and no user can modify or delete the object, until that retention policy has expired.
To enable retention for a bucket,
- Sign in to your IDrive® e2 account and navigate to the 'Buckets' tab.
- Click corresponding to a bucket.
- In the 'Bucket Summary' tab, use the toggle switch to enable/ disable 'Retention' to implement rules for object deletion and secure data against accidental deletion.
- Choose the preferred retention mode, duration, and validity.
- Click 'Update Bucket' to save the access permissions.
Note:
- Retention applies to all the objects in a bucket.
- Objects cannot be deleted until the retention policy has expired. Delete operation only removes the object from the default view while a locked version of the object is retained. Click to view and manage the retained version.
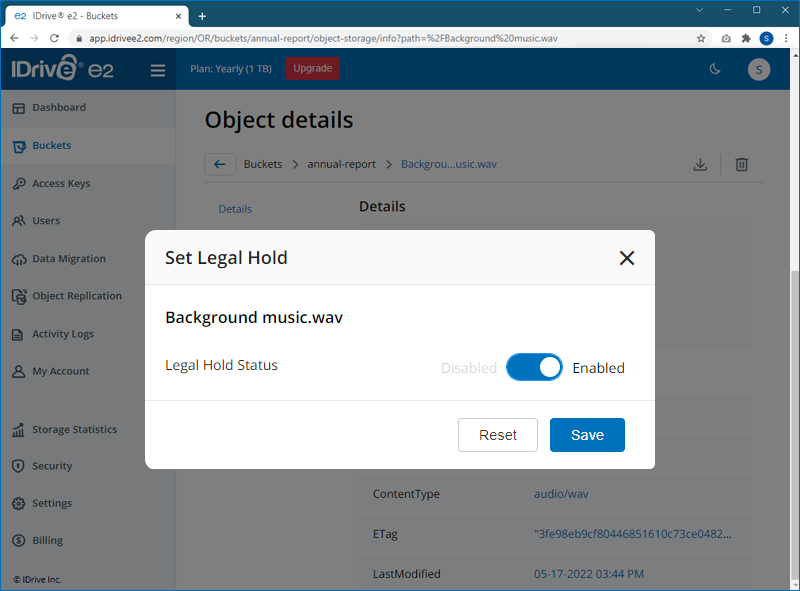
Legal hold is an additional locking mechanism that can be placed on an object in an Object Lock enabled bucket. A legal hold will prevent the modification or deletion of an object indefinitely until the legal hold has been removed. It overrides both Governance Mode, and Compliance Mode retention policies.
However, it does not remove them. After removing the legal hold, the existing Governance Mode, or Compliance Mode retention policy will still be in effect.