Frequently Asked Questions

Microsoft Office 365 Entra ID

Microsoft Office 365 Entra ID

If your question is not addressed below, please contact us through our support form and we'll get back to you shortly.


Backup

What is Microsoft Entra ID?
How do I enable Microsoft Entra ID Backup in IDrive®?
Where can I get an overview of Entra ID on the IDrive® Microsoft Office 365 Backup console?
Where can I view the details for each backed-up Entra ID object?
How can I set the backup action as 'Active' and 'Unprotect' for all objects simultaneously?
How can I export the Entra ID object backup logs to local storage?
Where can I get a consolidated view of objects segregated by their corresponding backup actions?
How can I perform an Entra ID objects backup?
Where can I view a full list of Entra ID object backups on the IDrive® Microsoft Office 365 Backup console?
How can I view Entra ID object backup snapshots for any specific date?

Restore

Can I perform a consolidated restore of all active Entra ID objects?
Which backed up Entra ID objects can be restored?
What object restoration options are available in IDrive?
How can I restore objects in the ‘Users’ category?
How can I restore objects in the ‘Groups’ category?
How can I restore objects in the ‘Roles & administrators’ category?
How can I restore objects in the ‘Administrative units’ category?
How can I restore objects in the ‘App registrations’ category?
How can I restore objects in the ‘Enterprise applications’ category?
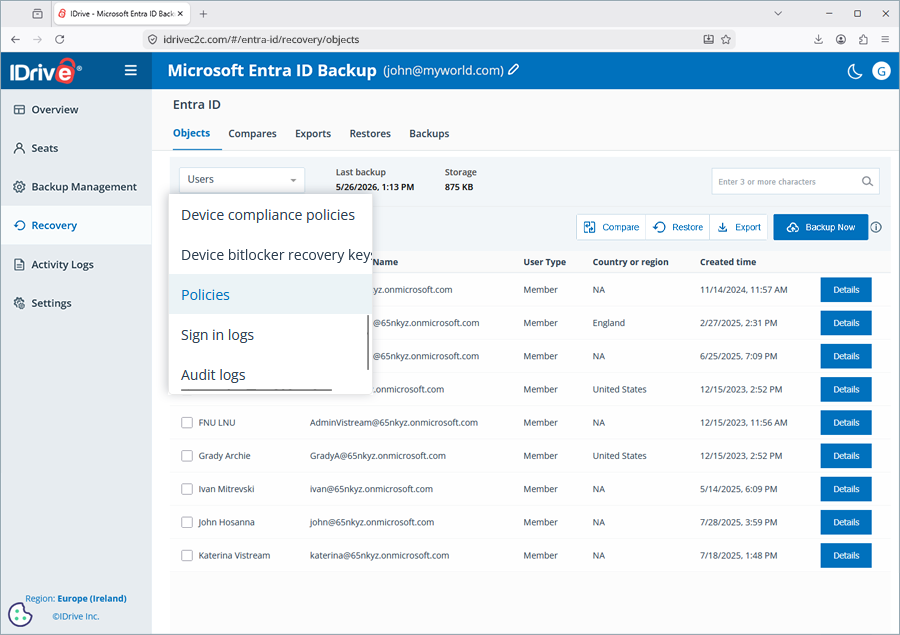
How can I restore objects in the ‘Policies’ category?
Can I compare two Entra ID object backup snapshots?
How can I download Entra ID object backup snapshot reports to my local storage?

What is Microsoft Entra ID?

Microsoft Entra ID (formerly Azure AD) is Microsoft's cloud-based identity and access management service that secures user identities and controls access to applications and resources across cloud and on-premises environments. It delivers essential capabilities, including single sign-on (SSO), multi-factor authentication (MFA), conditional access, and passwordless authentication to protect against identity-based threats. The service integrates with Microsoft 365, Azure, and third-party platforms like AWS and Salesforce, serving as the foundation for modern identity management and Zero Trust security. Renamed from Azure AD in July 2023, Entra ID is critical for organizations implementing secure remote work and managing cloud identities at scale.

How do I enable Microsoft Entra ID Backup in IDrive®?

You can connect Microsoft Entra ID to IDrive for backup by following the steps below.

  1. Sign in to the Microsoft Office 365 Backup web console.
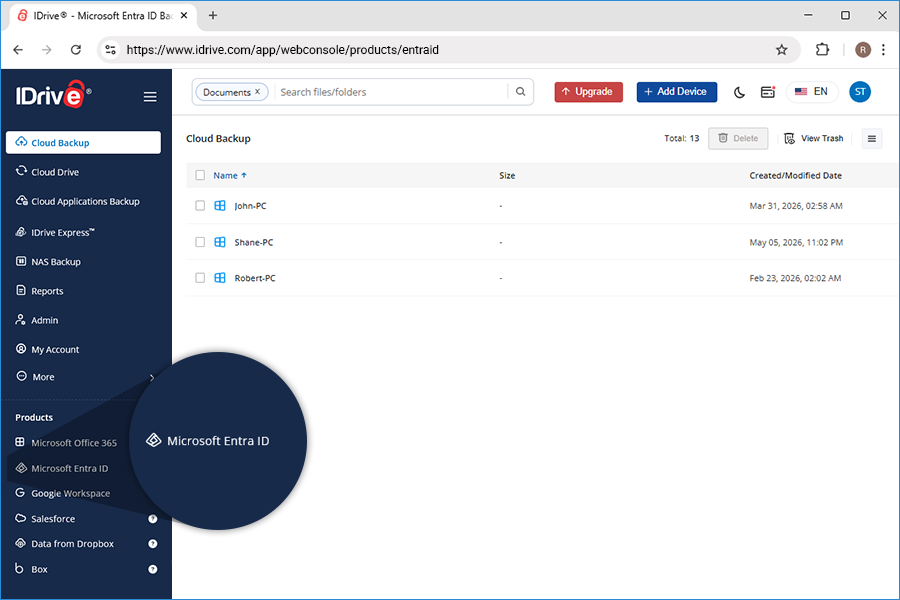
  2. Navigate to the Entra ID tab.
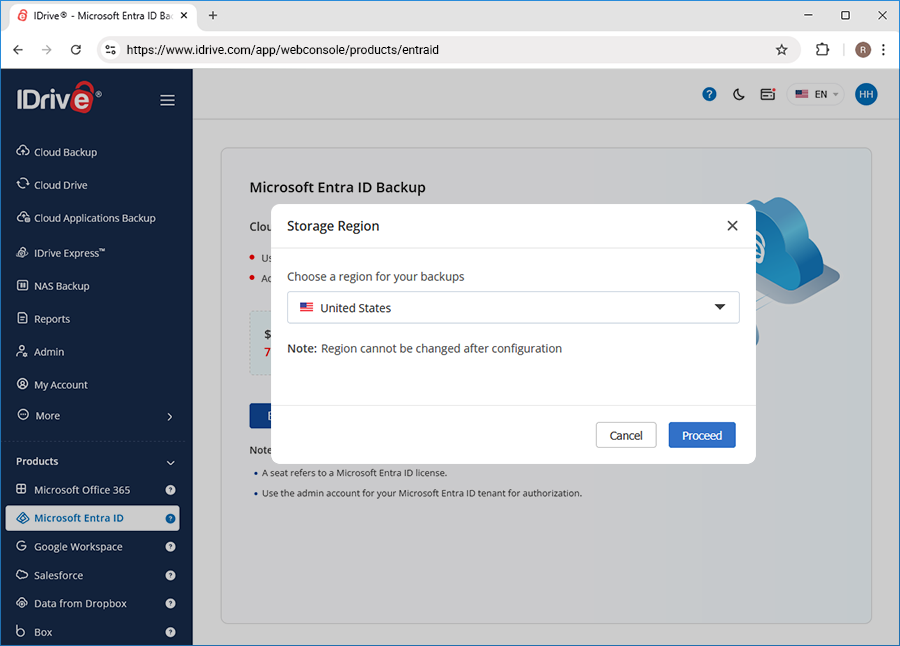
  3. Click Connect Microsoft Entra ID. You will be redirected to the Microsoft login page and prompted to connect your Microsoft Office 365 account. Once the connection is successful, Entra ID backup gets enabled, and the initial backup begins.

Where can I get an overview of Entra ID on the IDrive® Microsoft Office 365 Backup console?

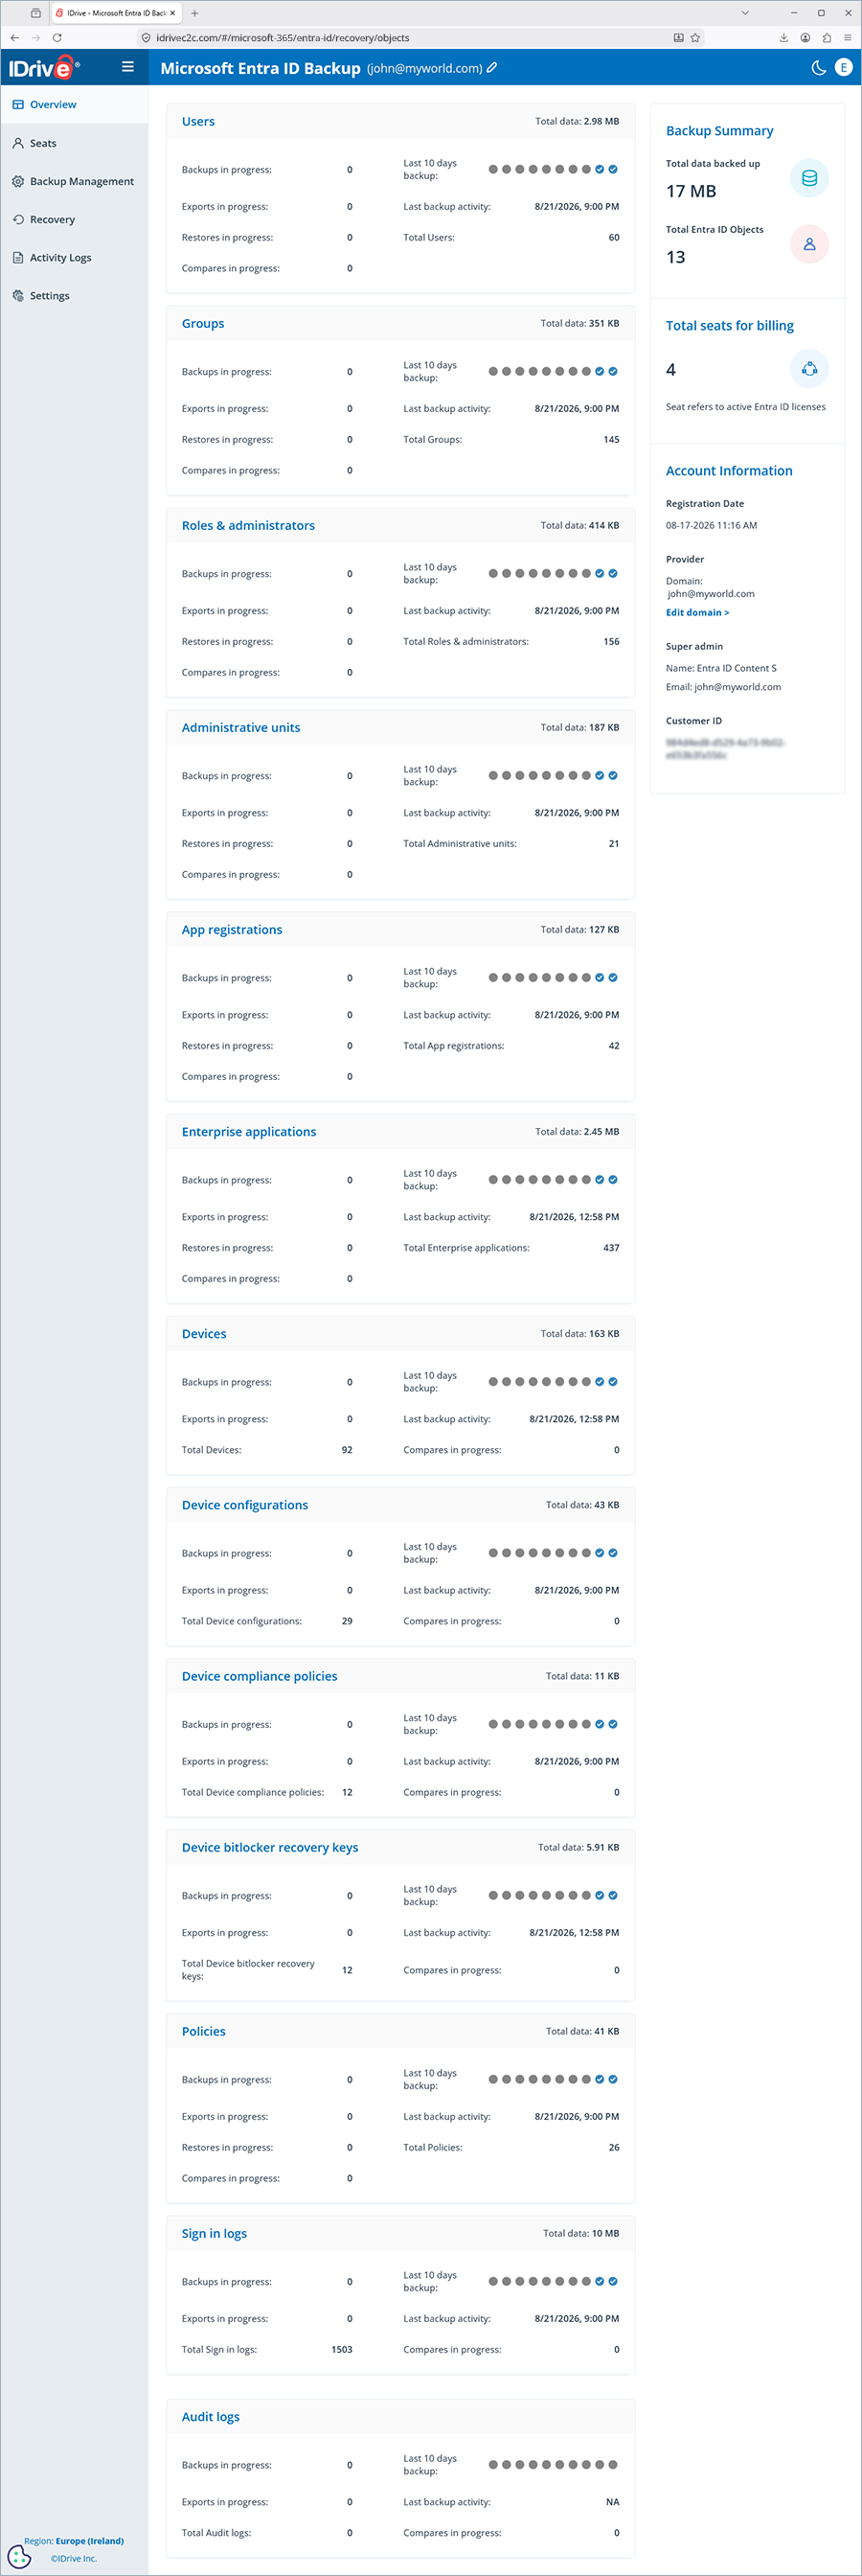
You can obtain an overview of Entra ID on the IDrive® Microsoft Office 365 Backup console by navigating to Entra ID > Overview. The Overview page provides comprehensive details on all object categories related to Entra ID backup operations, each in its dedicated section. The object categories are listed as follows.

  • Users
  • Groups
  • Roles & administrators
  • Administrative units
  • App registrations
  • Enterprise applications
  • Devices
  • Policies
  • Sign in logs
  • Audit logs
  • Device configurations
  • Device compliance policies
  • Device BitLocker recovery keys

Each section corresponding to a specific object category showcases the following details.

  • Backups in progress
    The total number of object backups in progress.
  • Exports in progress
    The total number of object exports in progress.
  • Restores in progress
    The total number of object restores in progress.
  • Compares in progress
    The total number of object compares in progress.
  • Last 10 days backup
    This section shows the backup statuses of the last 10 days. Hovering over each status indicator displays a data tooltip with details, including the date and the total number of backup statuses for each category (Completed, In Progress, Failed).
  • Last backup activity
    The timestamp of the last backup activity.
  • Total objects
    The total number of objects in the specific object category available for backup.
  • Total data
    The total backup data for the specific object category.

In addition to the objects, the Overview page also offers details into:

  • Backup Summary
    The backup summary displays the total amount of data backed up and the total number of Entra ID licenses associated with the Microsoft account connected to IDrive.
  • Total seats for billing
    The number of seats subject to billing, including active, paused, and archived users, as well as Entra ID licenses.
  • Scope of Backup
    Clicking this link redirects you to the Scope of Backup and Restore for Entra ID data.
  • Account Information
    The account information section displays the registration timestamp, Microsoft domain account, super admin name and email, customer ID, and the administrative center for domain and admin management.

Where can I view the details for each backed-up Entra ID object?

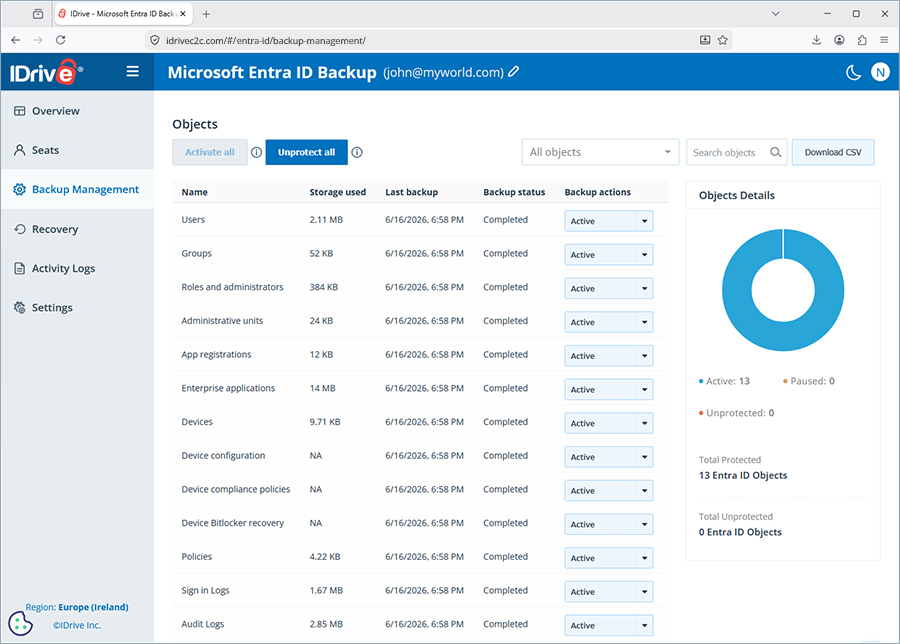
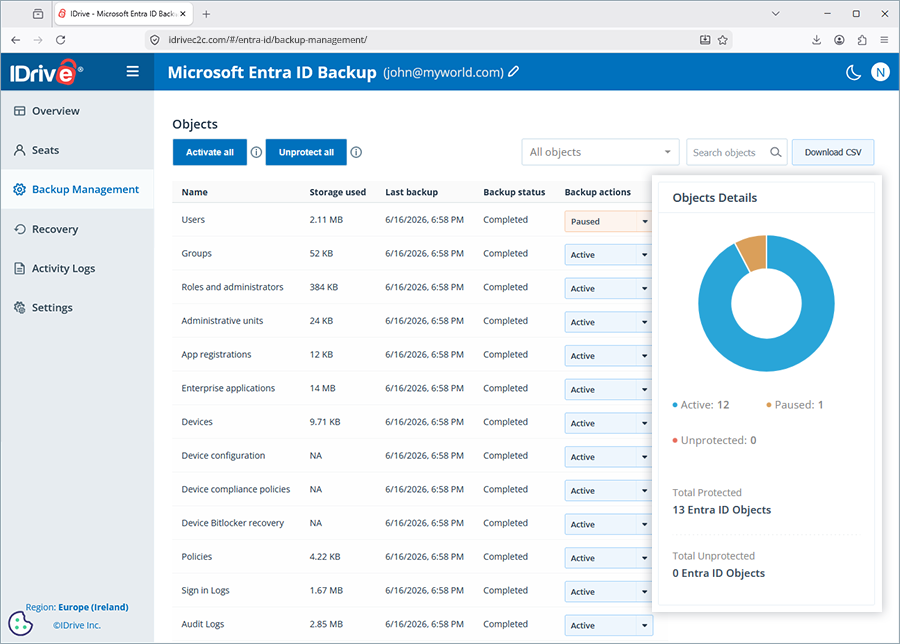
You can view the details of all objects corresponding to Entra ID on the IDrive® Microsoft Office 365 Backup console.

  1. Go to Entra ID > Seat Management.
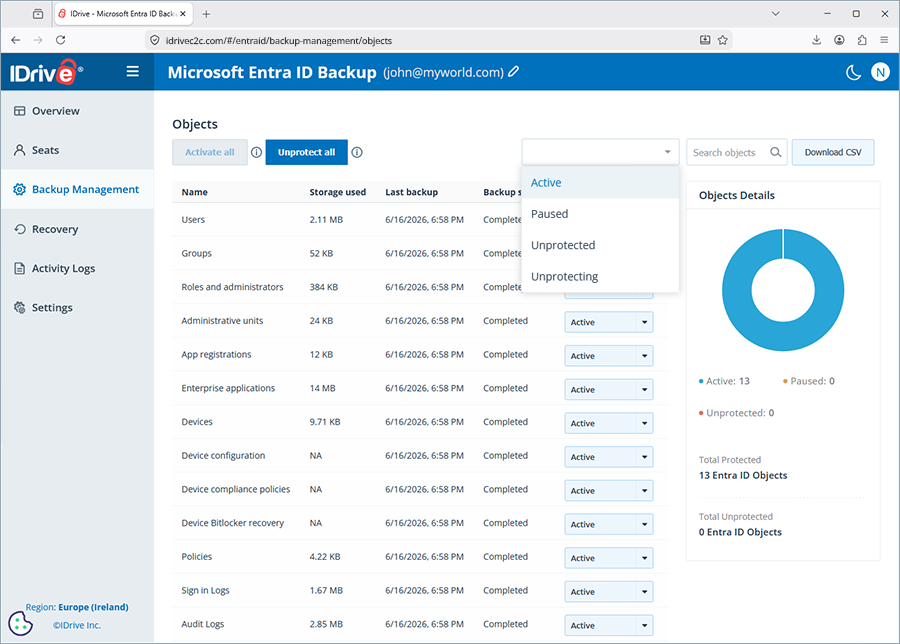
  2. Click the dropdown and select All objects. The list of objects appears in the grid below, segregated by:
    1. Name
    2. Storage used
    3. Last backup
    4. Backup status
    5. Backup actions
      Click the individual Backup actions dropdown for any particular object to change its backup action as required.
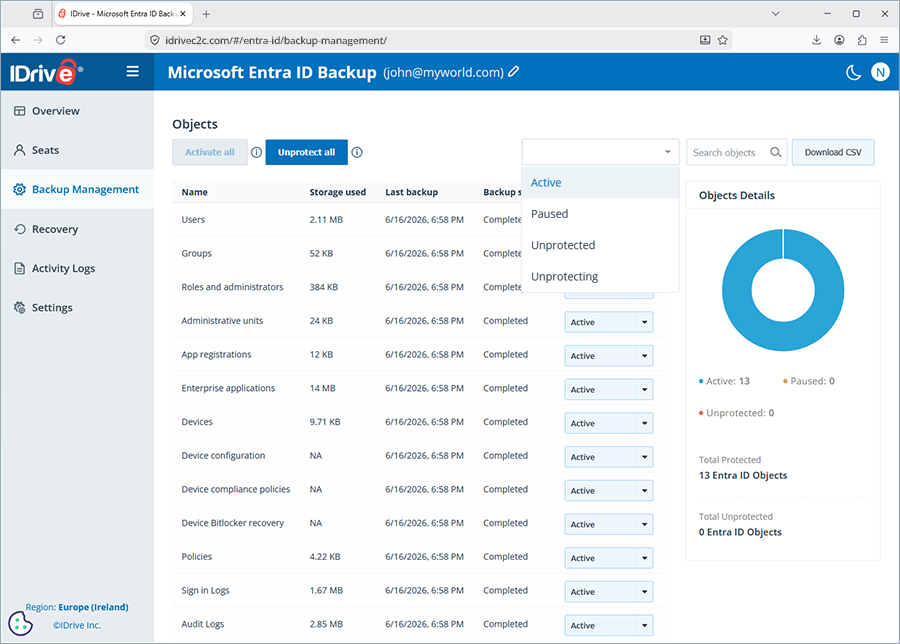
  3. To filter objects by backup actions, click the dropdown and choose the desired backup actions. The list displays the corresponding objects and their details.
  4. You can also search for specific objects and view their corresponding details.

How can I set the backup action as 'Active' and 'Unprotect' for all objects simultaneously?

The following steps can help you set the backup action as ‘Active’ and ‘Unprotect’ for all objects simultaneously.

  1. Go to Entra ID > Seat Management.
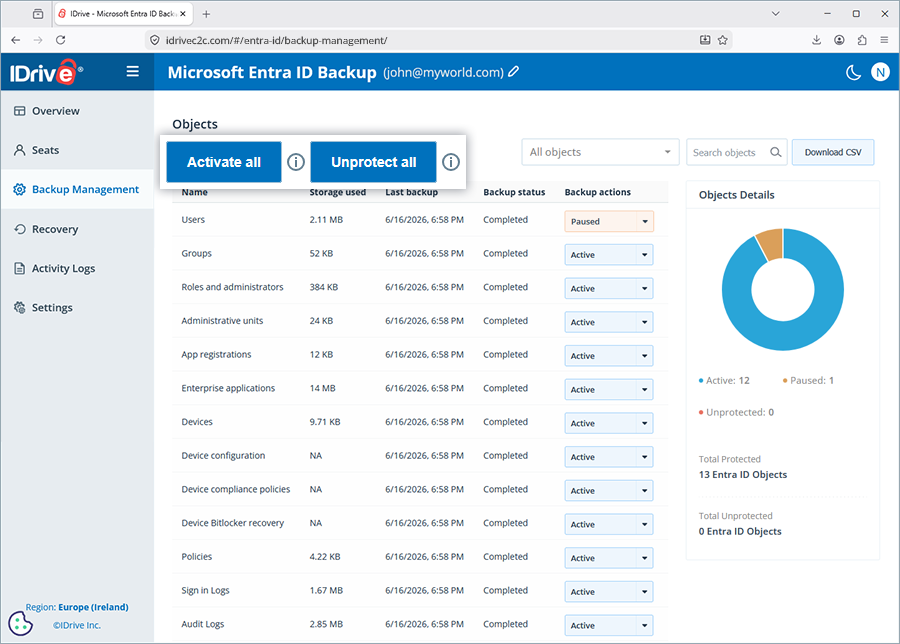
  2. To set the backup action as Active for all unprotected and paused objects simultaneously, click Activate All.
  3. To set the backup action as Unprotect for all active, paused, and archived objects simultaneously, click Unprotect All.

How can I export the Entra ID object backup logs to local storage?

To export your Entra ID object backup logs to local storage:

  1. Go to Entra ID > Seat Management.
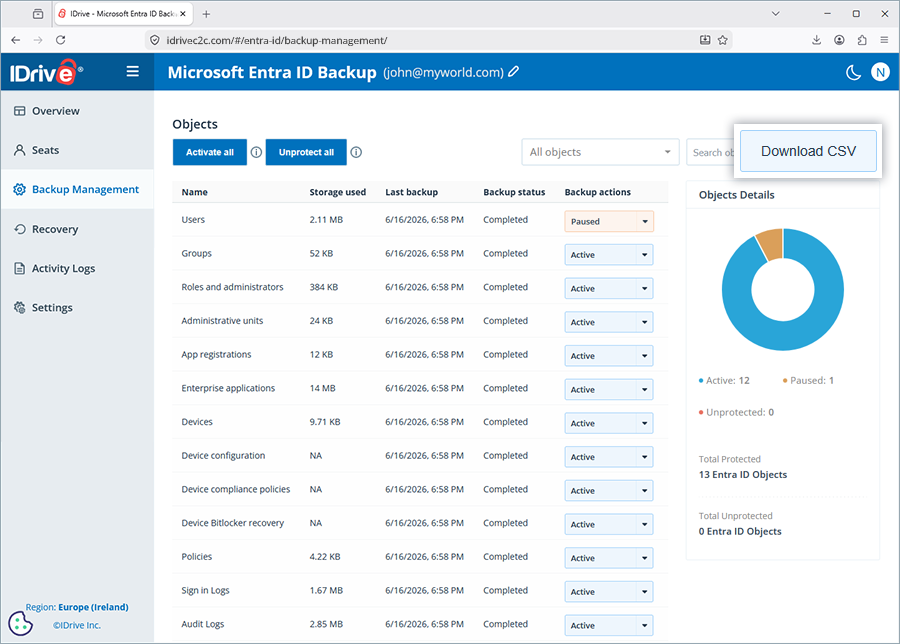
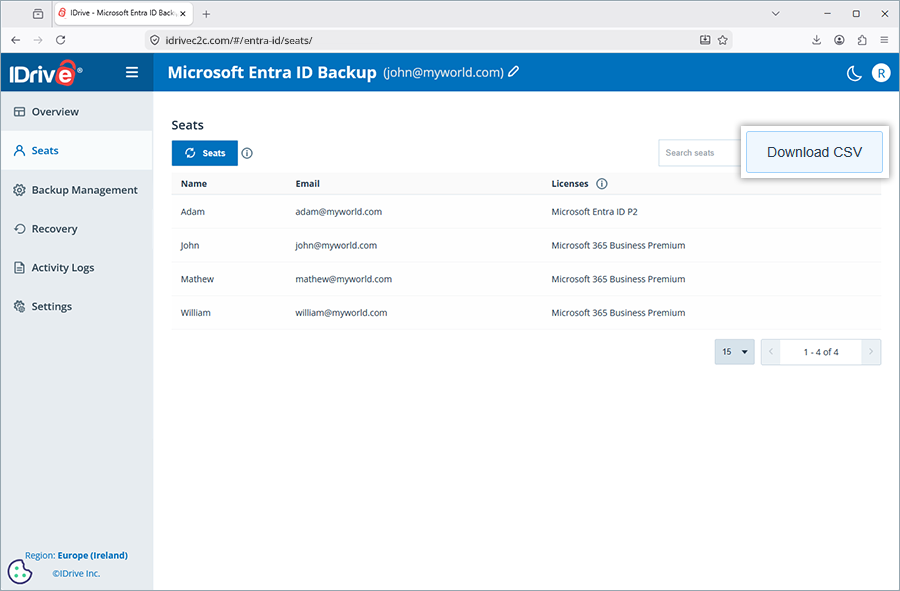
  2. Click Download CSV. A File was exported message appears when the backup logs are downloaded to your local storage in CSV format.

Where can I get a consolidated view of objects segregated by their corresponding backup actions?

You can get a consolidated view of the objects based on their backup actions by following the steps below.

  1. Navigate to Entra ID > Seat Management.
  2. The collapsible Objects Details sidebar displays a donut chart showing objects distributed by their backup actions. The sidebar also lists the number of objects corresponding to each backup action: Active, Paused, Unprotected, and Archived.
  3. Scrolling down the sidebar shows the number of Entra ID objects categorized as Total Protected and Total Unprotected.

How can I perform an Entra ID objects backup?

To perform an Entra ID objects backup,

  1. Go to Entra ID > Recovery.
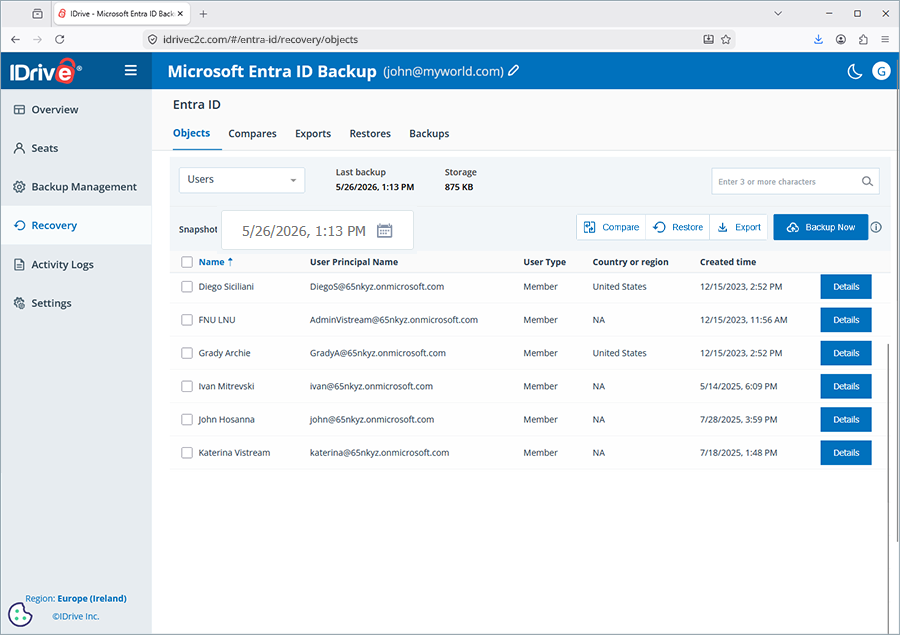
  2. Navigate to the Objects tab.
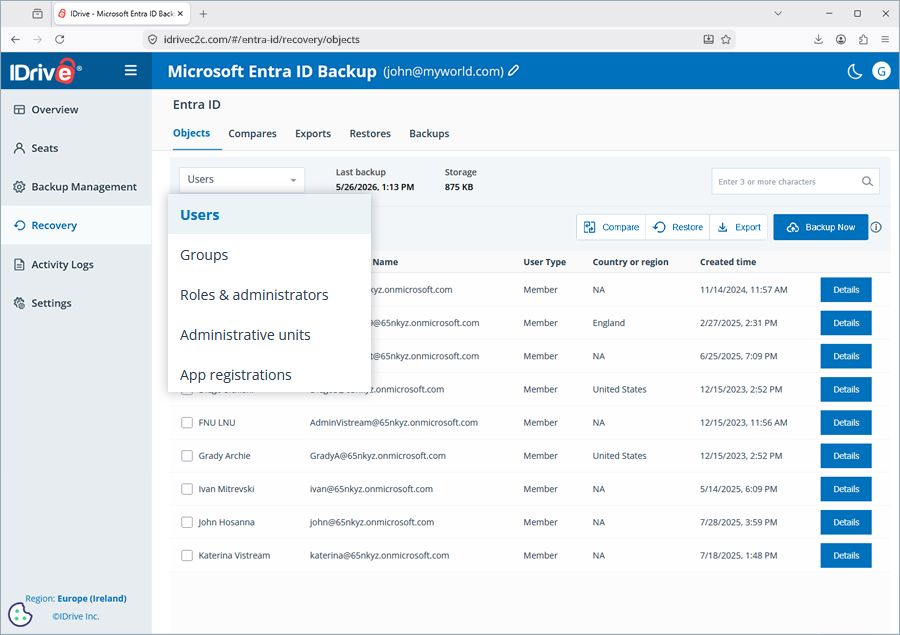
  3. Click the dropdown and select an Entra ID object category to back up (Users, Groups, Roles & administrators, Administrative units, App registrations, Enterprise applications, Devices, Policies, Sign in logs, Audit logs, Device configurations, Device compliance policies, Device BitLocker recovery keys).
    Note: You can select only one Entra ID object category to back up, as each object's dependency inclusions and attributes are unique.
  4. Based on the selected object category, the corresponding objects are listed in the grid below.
  5. Scroll to the right and click Details for the particular object you wish to back up.
  6. The Object Entry Details popup appears, where you can view all details regarding the corresponding object.
  7. Choose individual objects by selecting their respective checkboxes, or select the Name checkbox to select all the objects available in the grid.
  8. Click Backup Now. A Backup is in progress message appears when the backup operation begins for all objects whose backup action is set to Active. A Backup Progress indicator appears on the left-side menu indicating an ongoing backup. You can also view the last backup timestamp and its storage size under the Objects tab.

Where can I view a full list of Entra ID object backups on the IDrive® Microsoft Office 365 Backup console?

To view the list of Entra ID object backups,

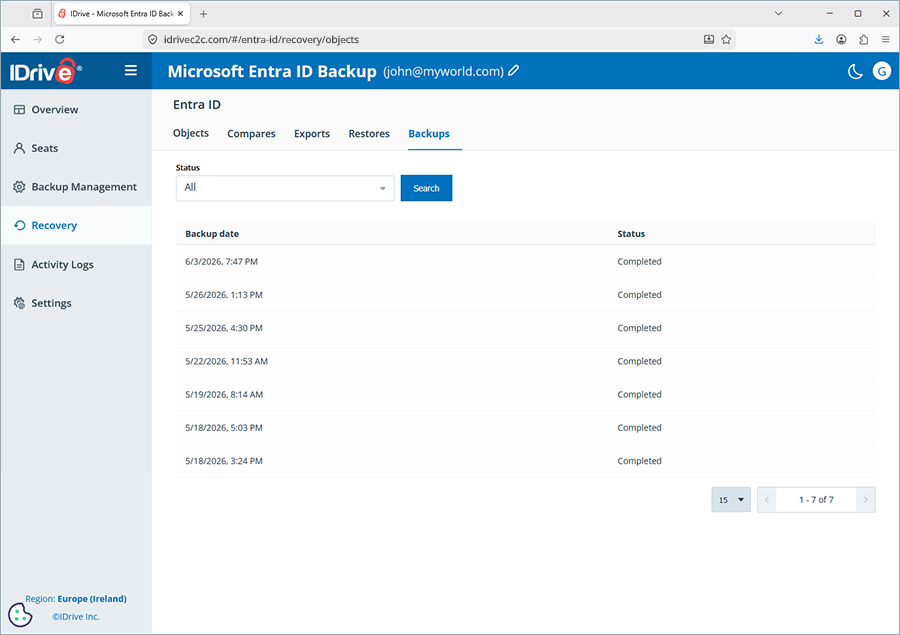
  1. Go to Entra ID > Recovery.
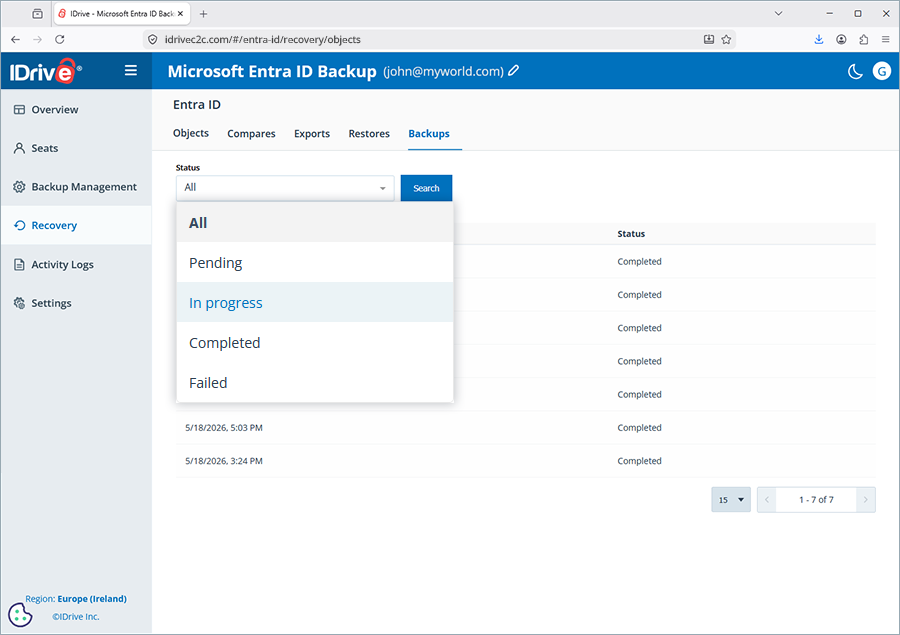
  2. Click the Backups tab. All the backups are listed in the grid with their respective Backup date and Status.
  3. To filter backups by status, click the dropdown and select a status (All, Pending, In progress, Completed, Failed).
  4. Click Search. The backups corresponding to the selected status appear in the grid.

How can I view Entra ID object backup snapshots for any specific date?

To view Entra ID backup snapshots for a specific date,

  1. Navigate to Entra ID > Recovery.
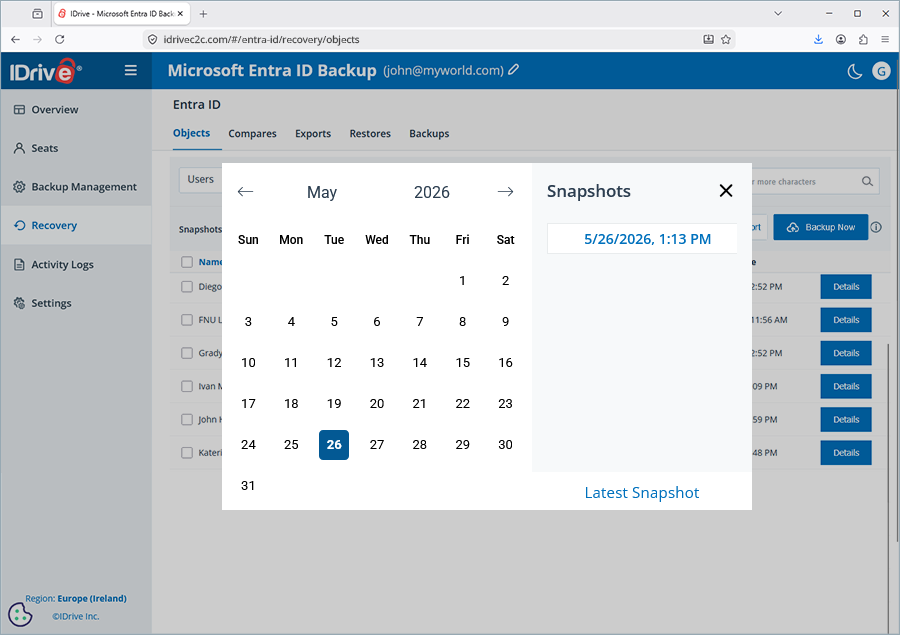
  2. Click the Snapshots field. The Snapshots popup appears
  3. Select a specific date for which you want to view the backup snapshot. The snapshots for the corresponding date appear on the right along with their timestamps.
  4. Click Latest Snapshot to view the latest backup snapshot.

Can I perform a consolidated restore of all active Entra ID objects?

No, you can not perform a consolidated restore of all active Entra ID objects, similar to a backup, because each object has unique dependencies and attributes that differ from those of others. Hence, you have to restore each Entra ID object category individually.

Which backed up Entra ID objects can be restored?

The following backed up objects can be restored from IDrive:

  • Users
  • Groups
  • Roles & administrators
  • Administrative units
  • App registrations
  • Enterprise applications
  • Policies

What object restoration options are available in IDrive?

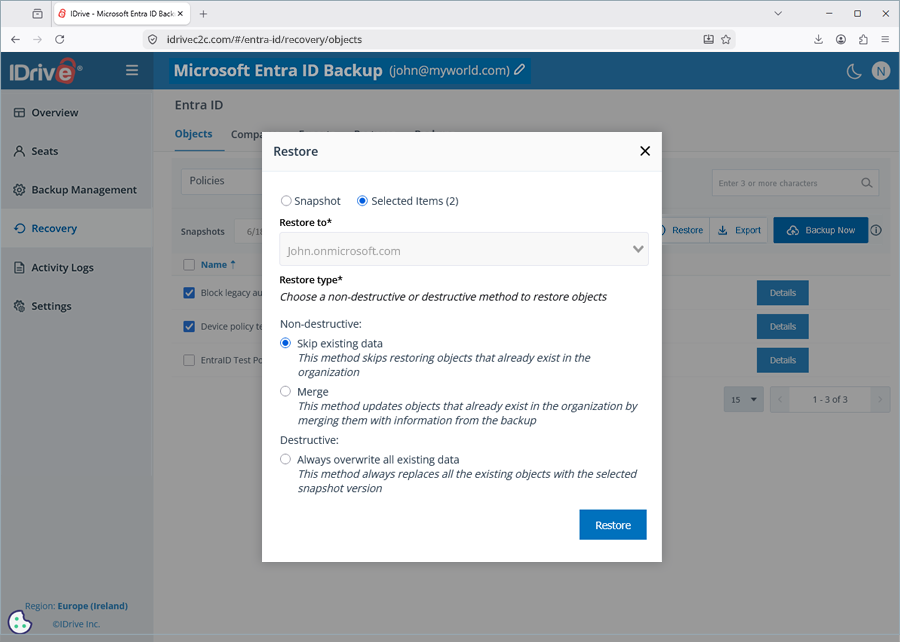
The IDrive® Microsoft Office 365 Backup provides three object restoration options, categorized as Non-destructive and Destructive.

  1. Non-destructive
    This object restoration process will not affect the existing objects in your organization.
    1. Skip existing data
      If an object(s) already exists in your organization, the object restoration process will skip them and create new records for the rest.
    2. Merge
      If an object(s) already exists in your organization, the object restoration process will merge their information with the existing object backup.
  2. Destructive
    The object restoration process directly affects the existing objects in your organization.
    1. Always overwrite all existing data
      Regardless of the object(s) availability in your organization, the object restoration process will overwrite or recreate the objects with the selected snapshot version.

How can I restore objects in the ‘Users’ category?

To restore objects that belong to the Users category,

  1. Go to Entra ID > Recovery.
  2. Navigate to the Objects tab.
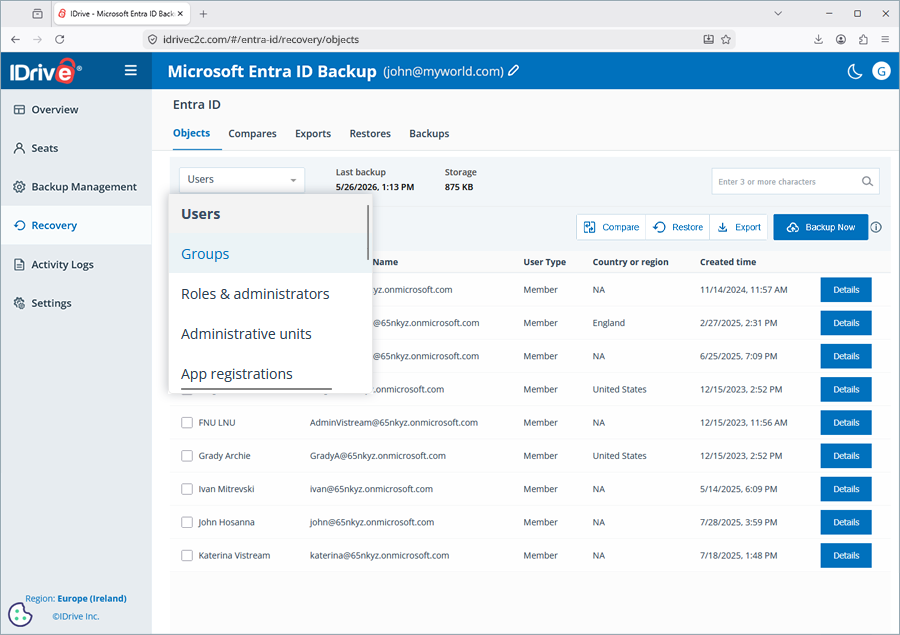
  3. Click the dropdown and select Users.
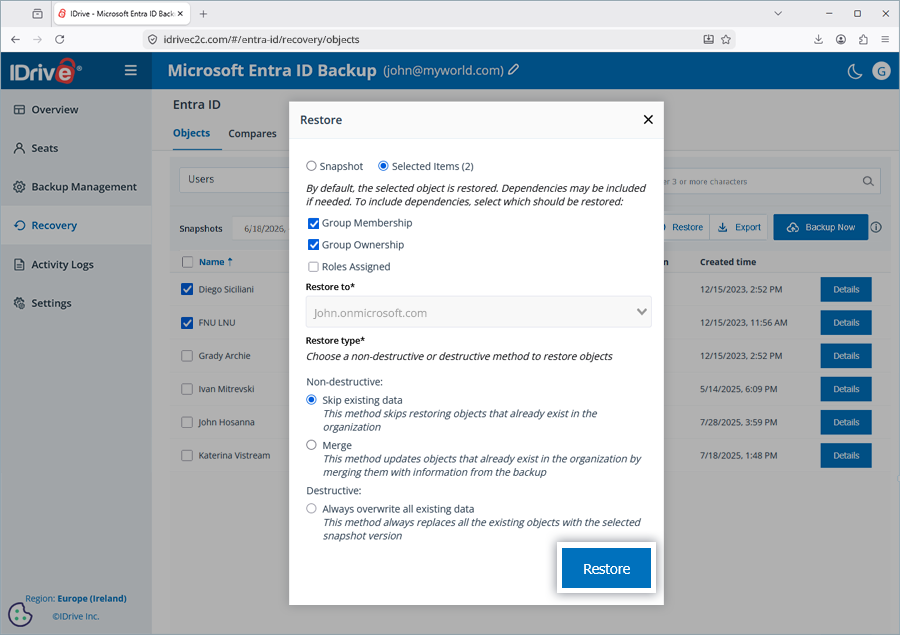
  4. To restore selected users, select the individual items in the grid, and then click Restore. Alternatively, to restore all users, click Restore.
  5. The Restore popup appears. Based on your selection, either the Snapshot or the Selected Items radio button is preselected.
  6. As an optional step, you can include dependencies for the selected objects while restoring them by selecting the corresponding checkboxes for the dependencies you want to include.
    1. Group membership
    2. Group ownership
    3. Roles assigned
  7. Click any of the non-destructive or destructive object restoration options based on your requirements.
    1. Skip existing data
    2. Merge
    3. Always overwrite all existing data
  8. Click Restore. Snapshot restore of the selected objects begins.

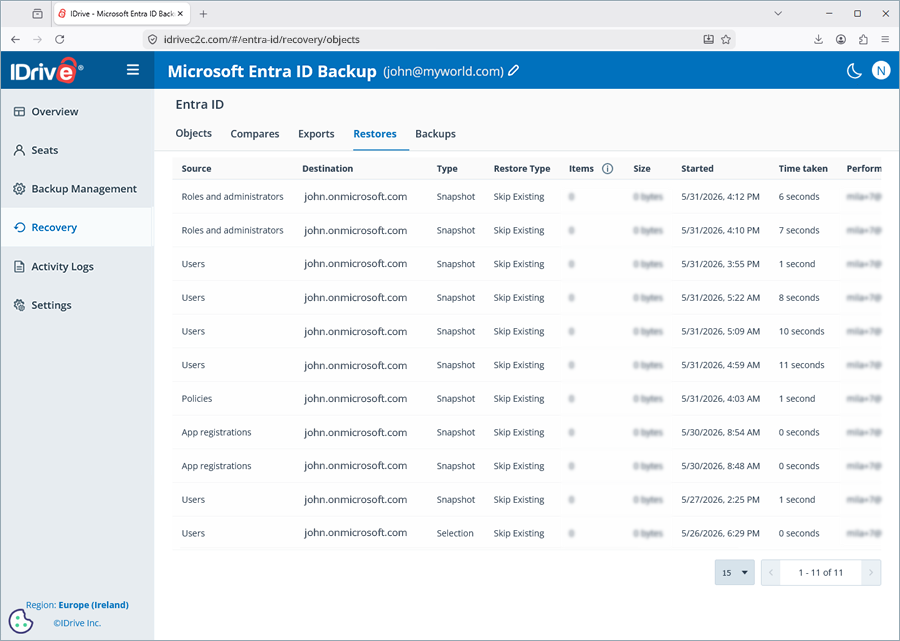
To view the details of the object restore operation,

  1. Navigate to Entra ID > Recovery.
  2. Click the Restores tab. The details of the user object restores are displayed in the grid with their respective Source (object type), Destination (domain name), Type (object selection), Restore Type (Restore options), Items (Total number of items restored), Size (object restore size), Started (object restore start timestamp), Time taken, Performed by, and Status.

How can I restore objects in the ‘Groups’ category?

To restore objects that belong to the Groups category

  1. Go to Entra ID > Recovery.
  2. Navigate to the Objects tab.
  3. Click the dropdown and select Groups.
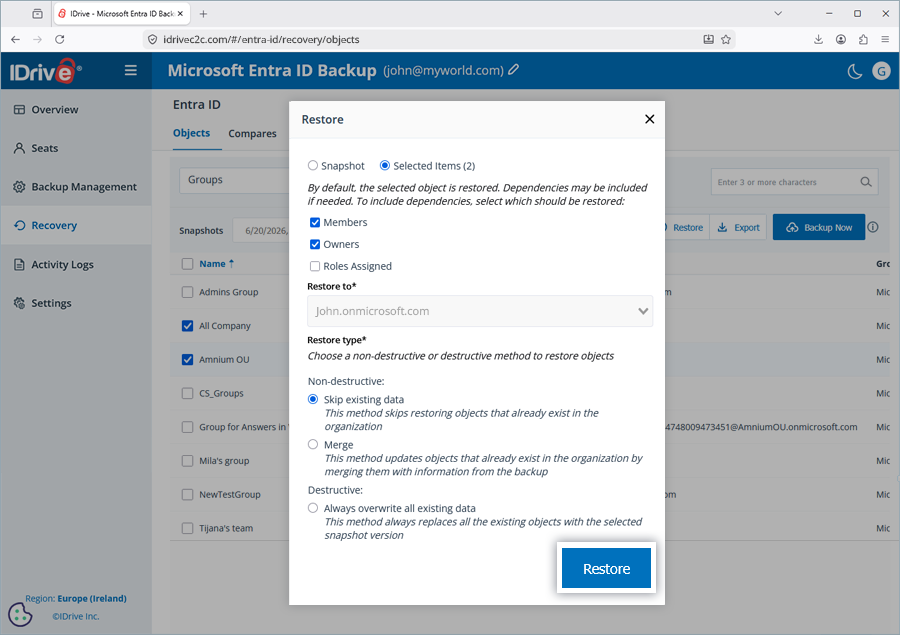
  4. To restore selected groups, select the individual items in the grid, and then click Restore. Alternatively, to restore all groups, click Restore.
  5. The Restore popup appears. Based on your selection, either the Snapshot or the Selected Items radio button is preselected.
  6. As an optional step, you can include dependencies for the selected objects while restoring them by selecting the corresponding checkboxes for the dependencies you want to include.
    1. Members
    2. Owners
    3. Roles assigned
  7. Click any of the non-destructive or destructive object restoration options based on your requirements.
    1. Skip existing data
    2. Merge
    3. Always overwrite all existing data
  8. Click Restore. Snapshot restore of the selected objects begins.

To view the details of the object restore operation,

  1. Navigate to Entra ID > Recovery.
  2. Click the Restores tab. The details of the user object restores are displayed in the grid with their respective Source (object type), Destination (domain name), Type (object selection), Restore Type (Restore options), Items (Total number of items restored), Size (object restore size), Started (object restore start timestamp), Time taken, Performed by, and Status.

How can I restore objects in the ‘Roles & administrators’ category?

To restore objects that belong to the Roles & administrators category,

  1. Go to Entra ID > Recovery.
  2. Navigate to the Objects tab.
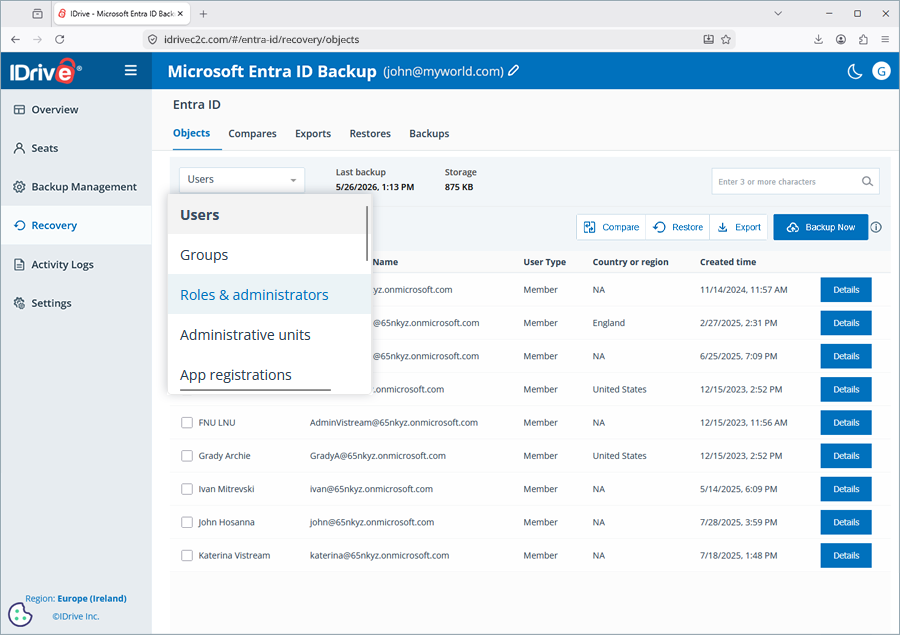
  3. Click the dropdown and select Roles & administrators.
  4. To restore selected objects, select the individual items in the grid, and then click Restore. Alternatively, to restore all objects, click Restore.
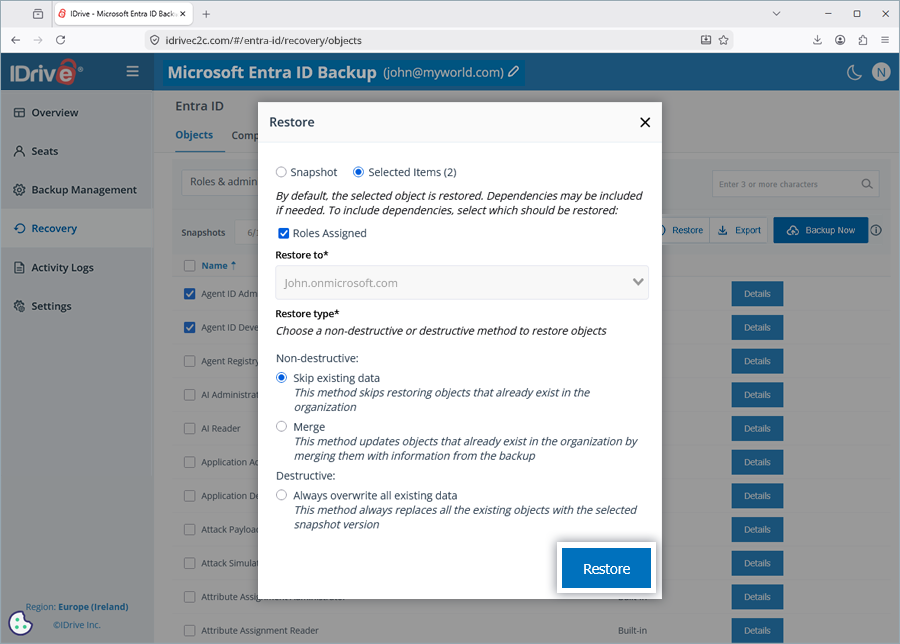
  5. The Restore popup appears. Based on your selection, either the Snapshot or the Selected Items radio button is preselected.
  6. As an optional step, you can include dependencies for the selected objects while restoring them by selecting the corresponding checkboxes for the dependencies you want to include.
    1. Roles assigned
  7. Click any of the non-destructive or destructive object restoration options based on your requirements.
    1. Skip existing data
    2. Merge
    3. Always overwrite all existing data
  8. Click Restore. Snapshot restore of the selected objects begins.

To view the details of the object restore operation,

  1. Navigate to Entra ID > Recovery.
  2. Click the Restores tab. The details of the user object restores are displayed in the grid with their respective Source (object type), Destination (domain name), Type (object selection), Restore Type (Restore options), Items (Total number of items restored), Size (object restore size), Started (object restore start timestamp), Time taken, Performed by, and Status.

How can I restore objects in the ‘Administrative units’ category?

To restore objects that belong to the Administrative units category,

  1. Go to Entra ID > Recovery.
  2. Navigate to the Objects tab.
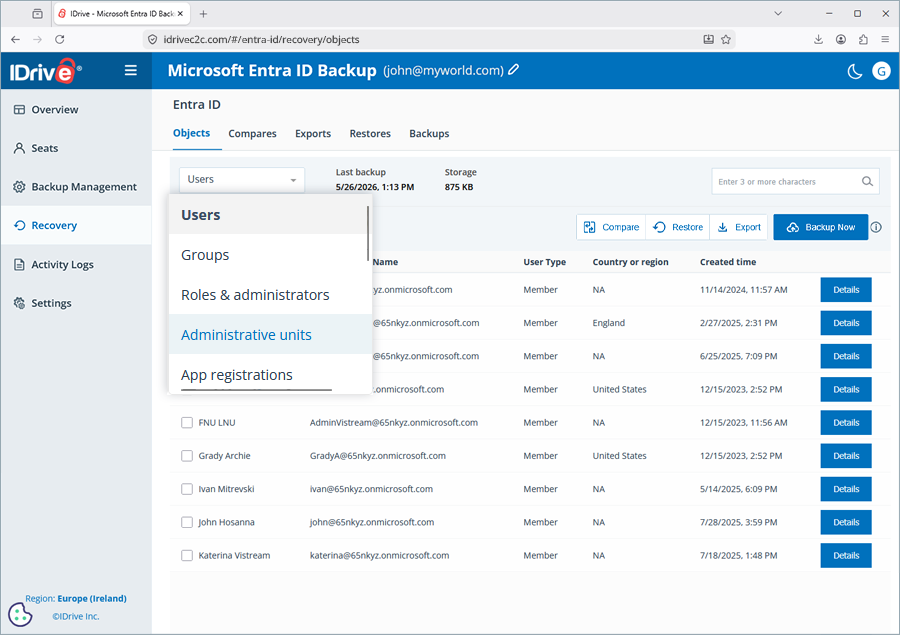
  3. Click the dropdown and select Administrative units.
  4. To restore selected administrative units, select the individual items in the grid, and then click Restore. Alternatively, to restore all administrative units, click Restore.
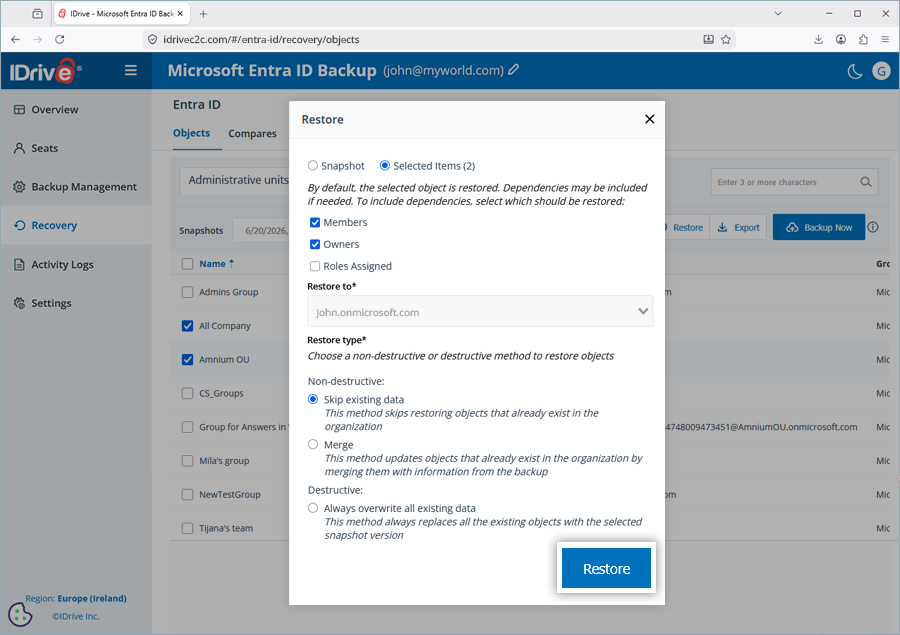
  5. The Restore popup appears. Based on your selection, either the Snapshot or the Selected Items radio button is preselected.
  6. As an optional step, you can include dependencies for the selected objects while restoring them by selecting the corresponding checkboxes for the dependencies you want to include.
    1. Group Membership
    2. Members
    3. Roles assigned
  7. Click any of the non-destructive or destructive object restoration options based on your requirements.
    1. Skip existing data
    2. Merge
    3. Always overwrite all existing data
  8. Click Restore. Snapshot restore of the selected objects begins.

To view the details of the object restore operation,

  1. Navigate to Entra ID > Recovery.
  2. Click the Restores tab. The details of the user object restores are displayed in the grid with their respective Source (object type), Destination (domain name), Type (object selection), Restore Type (Restore options), Items (Total number of items restored), Size (object restore size), Started (object restore start timestamp), Time taken, Performed by, and Status.

How can I restore objects in the ‘App registrations’ category?

To restore objects that belong to the App registrations category,

  1. Go to Entra ID > Recovery.
  2. Navigate to the Objects tab.
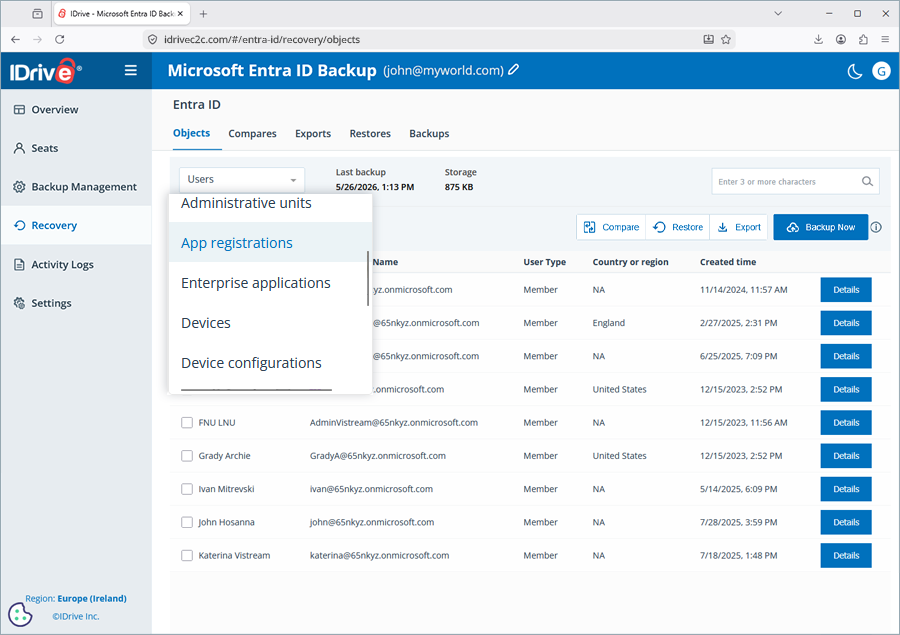
  3. Click the dropdown and select App registrations.
  4. To restore selected app registrations, select the individual items in the grid, and then click Restore. Alternatively, to restore all app registrations, click Restore.
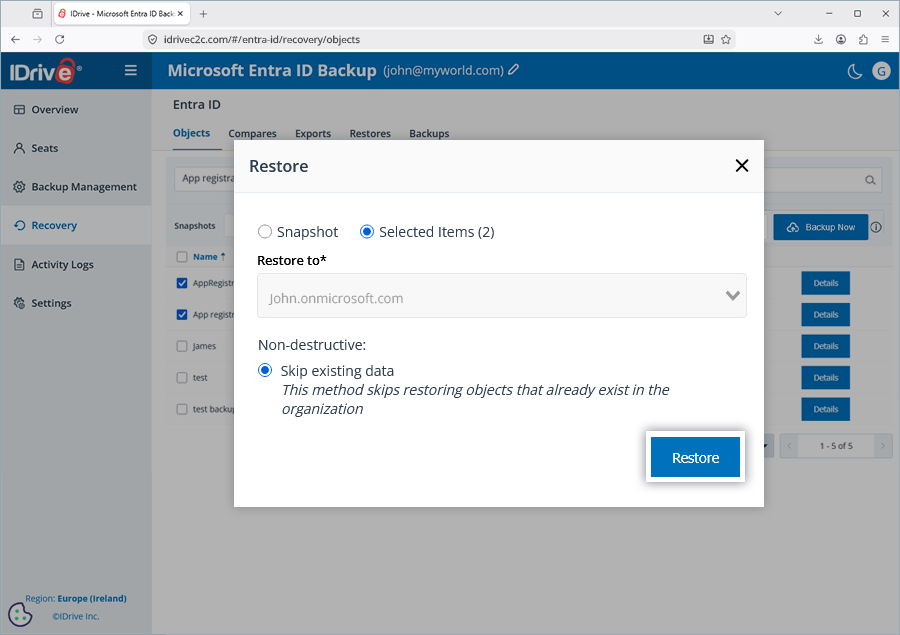
  5. The Restore popup appears. Based on your selection, either the Snapshot or the Selected Items radio button is preselected.
  6. The non-destructive object restoration option is preselected.
    1. Skip existing data
  7. Click Restore. Snapshot restore of the selected objects begins.

To view the details of the object restore operation,

  1. Navigate to Entra ID > Recovery.
  2. Click the Restores tab. The details of the user object restores are displayed in the grid with their respective Source (object type), Destination (domain name), Type (object selection), Restore Type (Restore options), Items (Total number of items restored), Size (object restore size), Started (object restore start timestamp), Time taken, Performed by, and Status.

How can I restore objects in the ‘Enterprise applications’ category?

To restore objects that belong to the Enterprise applications category,

  1. Go to Entra ID > Recovery.
  2. Navigate to the Objects tab.
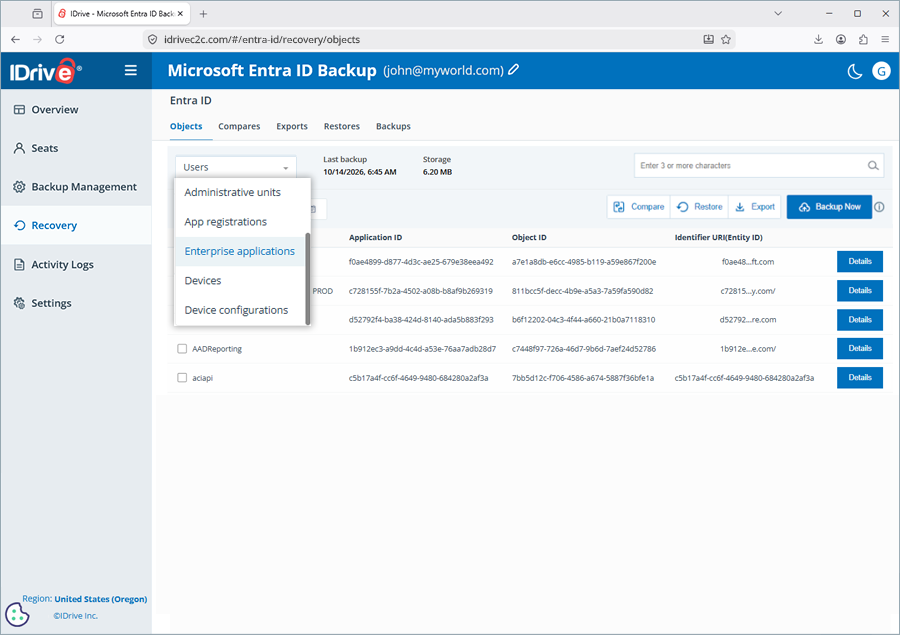
  3. Click the dropdown and select Enterprise applications.
  4. To restore selected objects, select the individual items in the grid, and then click Restore. Alternatively, to restore all objects, click Restore.
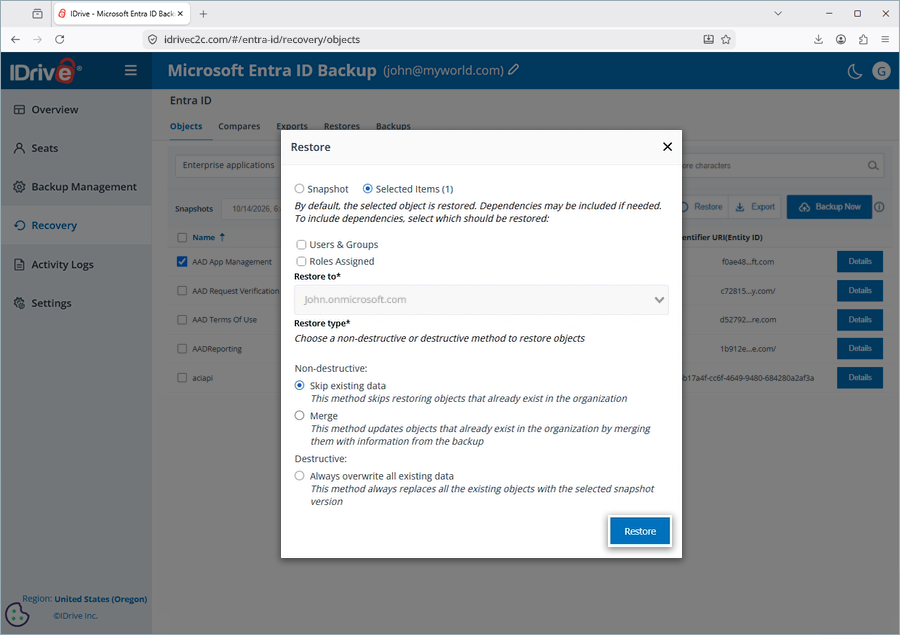
  5. The Restore popup appears. Based on your selection, either the Snapshot or the Selected Items radio button is preselected.
  6. As an optional step, you can include dependencies for the selected objects while restoring them by selecting the corresponding checkboxes for the dependencies you want to include.
    1. Users & Groups
    2. Roles assigned
  7. Click any of the non-destructive or destructive object restoration options based on your requirements.
    1. Skip existing data
    2. Merge
    3. Always overwrite all existing data
  8. Click Restore. Snapshot restore of the selected objects begins.

To view the details of the object restore operation,

  1. Navigate to Entra ID > Recovery.
  2. Click the Restores tab. The details of the user object restores are displayed in the grid with their respective Source (object type), Destination (domain name), Type (object selection), Restore Type (Restore options), Items (Total number of items restored), Size (object restore size), Started (object restore start timestamp), Time taken, Performed by, and Status.

How can I restore objects in the ‘Policies’ category?

To restore objects that belong to the Policies category,

  1. Go to Entra ID > Recovery.
  2. Navigate to the Objects tab.
  3. Click the dropdown and select Policies.
  4. To restore selected policies, select the individual items in the grid, and then click Restore. Alternatively, to restore all policies, click Restore.
  5. The Restore popup appears. Based on your selection, either the Snapshot or the Selected Items radio button is preselected.
  6. Click any of the non-destructive or destructive object restoration options based on your requirements.
    1. Skip existing data
    2. Merge
    3. Always overwrite all existing data
  7. Click Restore. Snapshot restore of the selected objects begins.

To view the details of the object restore operation,

  1. Navigate to Entra ID > Recovery.
  2. Click the Restores tab. The details of the user object restores are displayed in the grid with their respective Source (object type), Destination (domain name), Type (object selection), Restore Type (Restore options), Items (Total number of items restored), Size (object restore size), Started (object restore start timestamp), Time taken, Performed by, and Status.

Can I compare two Entra ID object backup snapshots?

Yes, you can compare either all entries or specific entries of two Entra ID object backup snapshots within the same object category (e.g., Users, Groups, Roles & administrators) using the Compare feature. To compare two Entra ID object backup snapshots,

  1. Go to Entra ID > Recovery.
  2. Navigate to the Objects tab.
  3. Click the dropdown and select an Entra ID object category to compare.
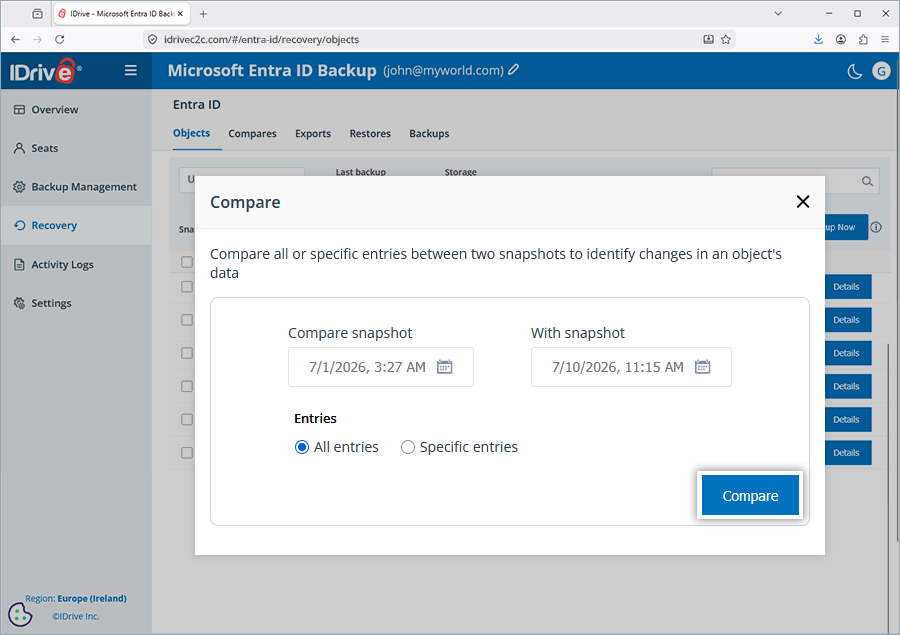
  4. Click Compare. The Compare popup opens up.
  5. Under Compare snapshot, click Calendar icon, then click a date on the calendar. Under Snapshots, click a snapshot timestamp to select it.
  6. Under With snapshot, click Calendar icon, then click a date on the calendar. Under Snapshots, click a snapshot timestamp to select it.
  7. Under Entries, click either of the All entries and Specific entries radio buttons. Clicking All entries compares all entries for an object across the selected snapshots, while clicking Specific entries lets you select specific entries within an object and compare them across the selected snapshots.
  8. Click Compare. A Compare is in progress flash message appears.

To view the list of Entra ID object backup snapshot compares,

  1. Go to Entra ID > Recovery.
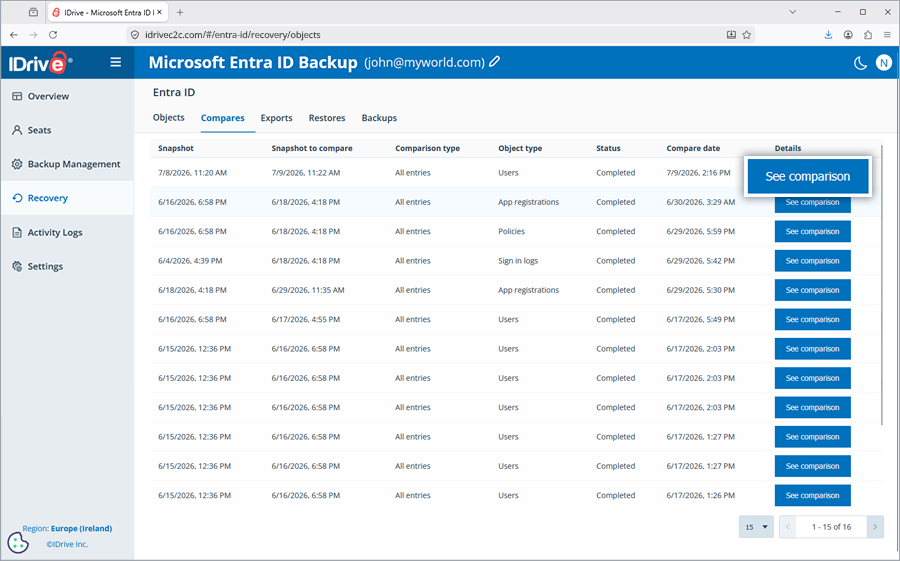
  2. Click the Compares tab. All the compares are listed in the grid with their respective Snapshot timestamp, Snapshot to compare timestamp, Comparison type, Object type, Status, Compare date timestamp, and Details.
  3. Under Details, click See Comparison to view the Object Comparison Report along with its generation timestamp and additional details, including the object backup snapshots compared.

How can I download Entra ID object backup snapshot reports to my local storage?

You can download or export Entra ID object backup snapshot reports using the Export feature. To export Entra ID object backup snapshot reports to your local storage,

  1. Go to Entra ID > Recovery.
  2. Navigate to the Objects tab.
  3. Click the dropdown and select an Entra ID object category to compare.
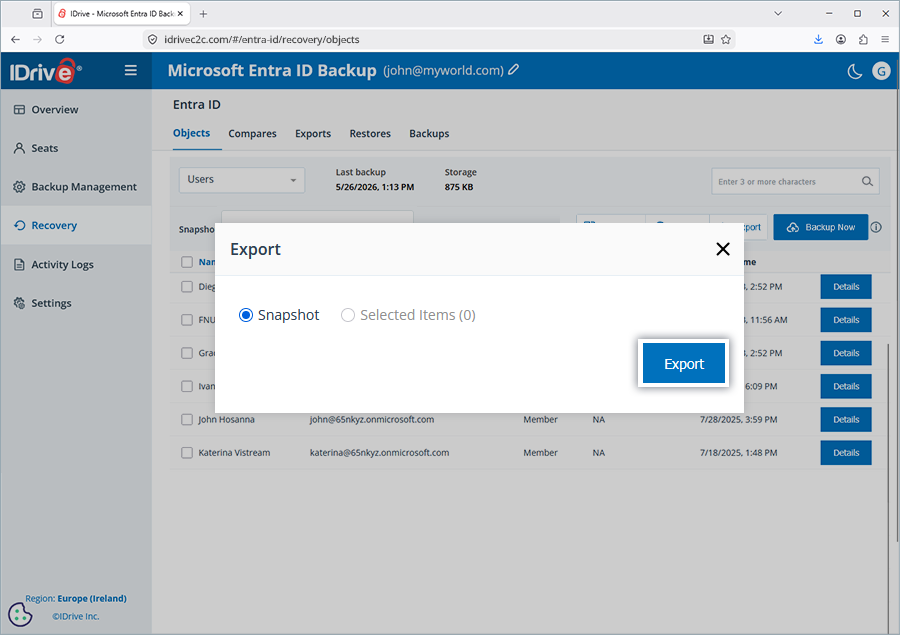
  4. To restore selected objects, select the individual items in the grid, and then click Export. Alternatively, to restore all objects simultaneously, click Export. The Export popup opens up.
  5. The Snapshot or Selected Items radio buttons are selected as per your object selection.
  6. Click Export. The object snapshot export begins.

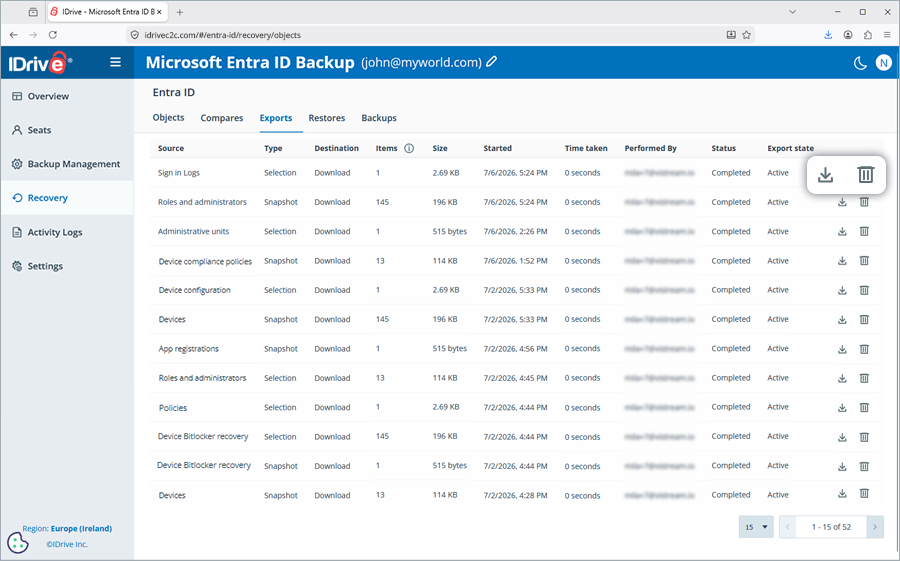
To view, download, or delete the list of Entra ID object backup snapshot exports,

  1. Go to Entra ID > Recovery.
  2. Click the Exports tab. All the compares are listed in the grid with their respective Source, Type, Destination, number of exported Items, Size of the exported file, start timestamp, time taken for the export, Performed by, Status of the export, and Export State (Deleted, Active).
  3. Click Download icon or Delete icon to download or delete the object export, respectively.
1-818-485-4333